How we built a special feature in Greetings from Zagreb Android app
Historical Zagreb comes to life in a mobile application!
Have you heard about an award-winning application for National & University Library in Zagreb?
Greetings from Zagreb is a mobile application made for the biggest Croatian library. The application provides historical and presents virtual walk on Zagreb city center, it combines maps, postcards, and photos to take you on a tour of Zagreb as it once was!
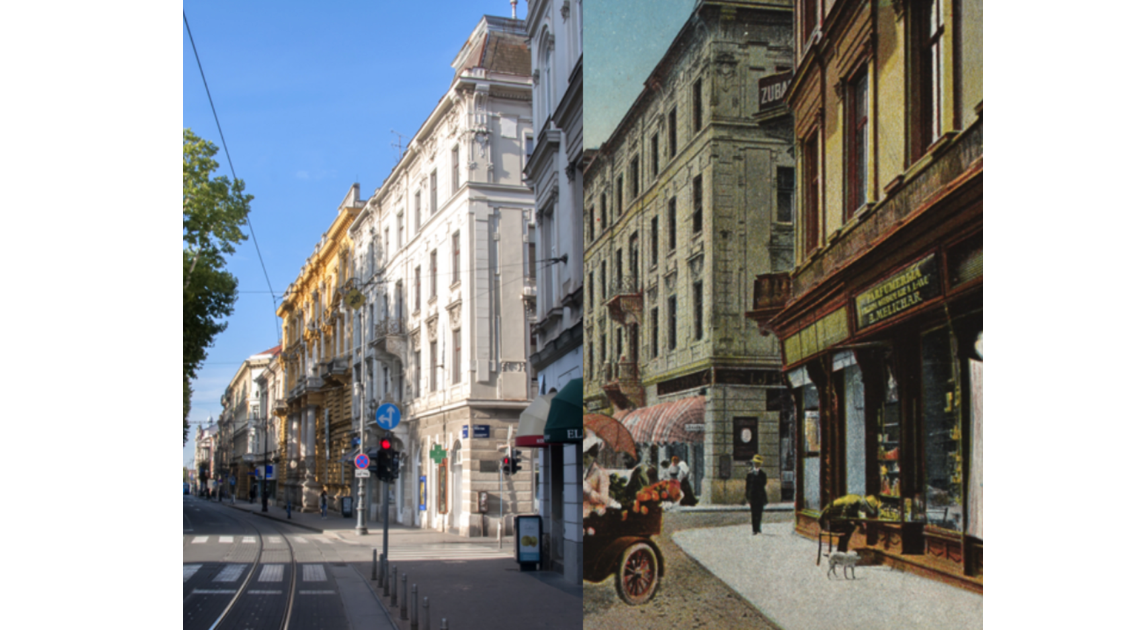
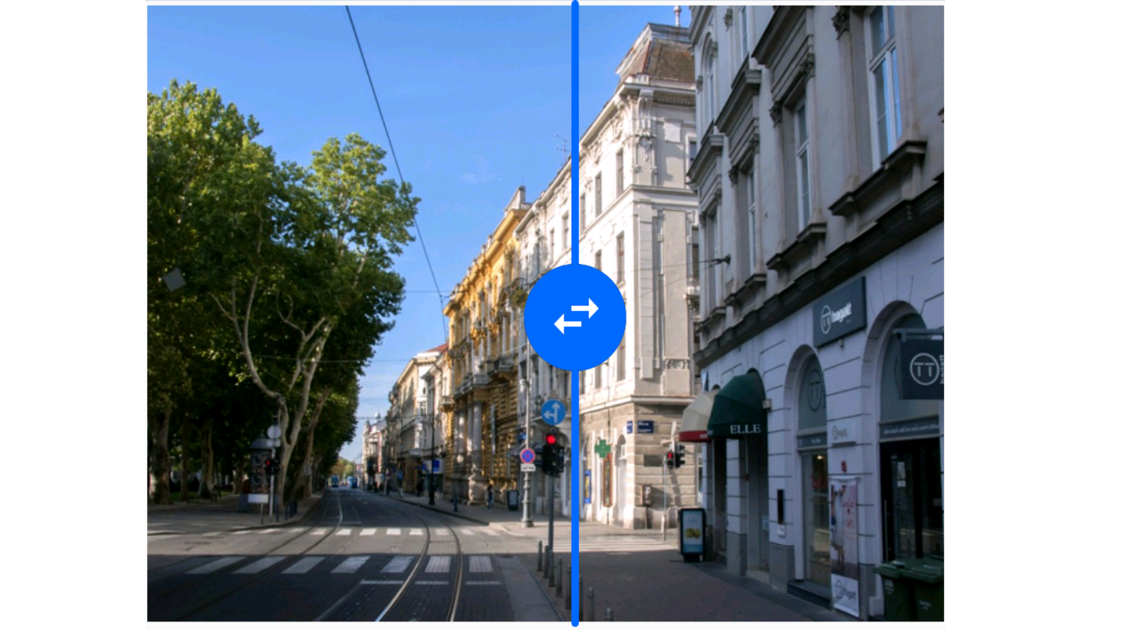
Looking into the past is the most exciting feature because the user can compare two images – one from history and another from the present. The application has 10 the most popular locations in Zagreb, so the user can see how some square or street looks now and how it looked then. That’s why we call this new idea – Before and after view!
This feature was so original that BibLibre International Library Marketing Award gave our client, National and University Library in Zagreb the third place in international librarian competition!
If 150 postcards in the application are not enough for you, the application will take you directly to the entire (and ever-growing) postcard collection of the library so you can continue exploring the city’s rich past.
This application was really exciting and pleasing to work on because we didn’t work on a feature like this, and also could not find some guidelines on the internet, so we needed to think about how we can solve it and how to present the best solution. This is where our Android development team excelled – at being creative and innovative!
Here are our developer’s thoughts through the process of developing this feature.
About the Before and after view
This feature has a simple usage. Due to thumb horizontal movement, one side of an image should overlap another side. A result of this action should be one image which has two images inside, one historical and one from the present. This approach is ideal for comparing two images. Feature example is shown below.
The code presented in this blog post is available on Factory Github profile.
The idea behind Before and after feature
The idea was to create two ImageViews inside some layout. The layout also should have a placeholder, mask and some thumb for dragging.
Placeholder should be shown before images are fully loaded after that placeholder should be hidden. That was archived by putting placeholder ImageView on a higher hierarchy inside layout then the two main ImageViews used for images loading.
Creating a movable thumb was tricky. The first approach was to put some view and calculate the current horizontal position and based on that figure how much of ImageView should be cropped. But that was too much work. So I decide to use something more native, and that is SeekBar.
SeekBar was an excellent solution because it provides everything I needed. It contains a horizontal movable thumb and onProgressChanged listener which gives me a value of thumb current position/progress, so I do not need to calculate it.
Maybe you ask yourself why I need a mask? Mask is used just for editing, and that is it.
Here comes XML code:
Troubles in Heaven
Solving XML was the easy part, now we need to choose the way for solving image overlapping.
My first idea was to change the width of both ImageViews. After stopping SeekBar, I thought to get progress value and calculate how much far away is left and right margin from SeekBar. After that setting ImageViews width and height should be the easy part.
But this approach is bad because I need to resize both ImageViews dynamically and I didn’t know how to load an image inside ImageView. If ImageView is resized then how to load properly image inside it without any scaling before and after thumb movement. The image inside was scaled not clipped.

The second shoot was a little bit better. I decided to save memory and processor power by making the right ImageView static and left ImageView cropable. This approach improved ram usage and processor power but didn’t solve the scaling/clipping problem.
Finally, I discovered the right way how to deal with image clipping.
The solution was to create ClipDrawable. ClipDrawable clips another Drawable based on this Drawable’s current level value, you can control how much the child Drawable gets clipped in width and height based on the level, as well as gravity to control where it is placed in its overall container.
After implementing the right approach, another problem was image loading. Images for loading are fetched from a server, so I used Glide. With Glide, I can quickly get bitmap and crate ClipDrawable, but this ClipDrawable doesn’t fit image loaded on the right side even if images are the same. The left image was a little bit bigger than right.

The solution was to create ClipDrawable for both images and then load it to the ImageViews. The right static image was clipped by zero level and the left dynamic image was clipped by level obtain from SeekBar The same thing is done for images loaded from the drawable folder.
And after that, I finally did my job well.
Here is a library of this feature
After a lot of work, I made an Android library and documentation for this feature. We made the library even more flexible by adding a bunch of custom attributes.
Feel free to use it and find a library and documentation on our Factory GitHub profile.
Want to know more about this Android application?
Check our case study of Greetings from Zagreb mobile application, download it on Google Play Store.
What do you think about this original feature? Do you have some ideas on how to solve it? Let us know your thoughts in Factory contact!