Introduction to Redux for web application development
The code presented in this blog post is available on GitHub.
State management is an important part of application development, particularly in large-scale applications where client and server data needs to be orchestrated into a coherent and maintainable entity. When it comes to developing web applications, particularly on the client-side, Redux is currently the most popular state management solution.
Delegating the duty of state management to an external dependency imposes a new set of rules on the development process. Redux is no different. It introduces actions, reducers, and stores, and uses those concepts to construct a fairly simple and effective state management architecture.
The aim of this article is to familiarise readers with Redux by building a Redux clone from the ground up, using the same API and general philosophy the library is built upon. Redux will be briefly introduced, it’s core concepts explained, and then the focus will shift to applying those concepts from scratch on a simple use case.
Let’s dive right in!
What is Redux?
Redux is an open-source JavaScript library for managing application state. Created by Dan Abramov and Andrew Clark, it was released in 2015 and has since found widespread adoption on the client-side for building reactive user interfaces.
Redux is built on three core principles:
- Provide a single source of truth for the application state
- Ensure application state is read-only and require changes to be made by emitting a descriptive action
- Perform state tree transformations based on aforementioned actions by using pure reducer functions
These core principles are realised through the store, reducer, and action concepts.
A store maintains the application state. If we want to use data from the application state, we read it through an interface provided to us by the store. If we want to change the application state, we dispatch an action into the store to trigger the change. If we want to get notified when a change happens, we subscribe to the store with a listener function. The store is our single source of truth for the current state of the application itself.
A reducer is a pure function that performs state transformations – it is the building block of a store. Therefore, in order to create a store we must first describe a reducer. Reducer functions take the state tree and transform it in all manner of ways, depending on the action dispatched into the store. Reducers do not need to change the state for all actions, but no matter what action they take (or don’t), a reducer will always return a new revision of the application state.
Actions are descriptive plain objects described by an action type and an optional payload. The action type is what identifies an action to the reducer, and the payload can be made up of any supplemental data that may affect the way the reducer transforms the state tree.
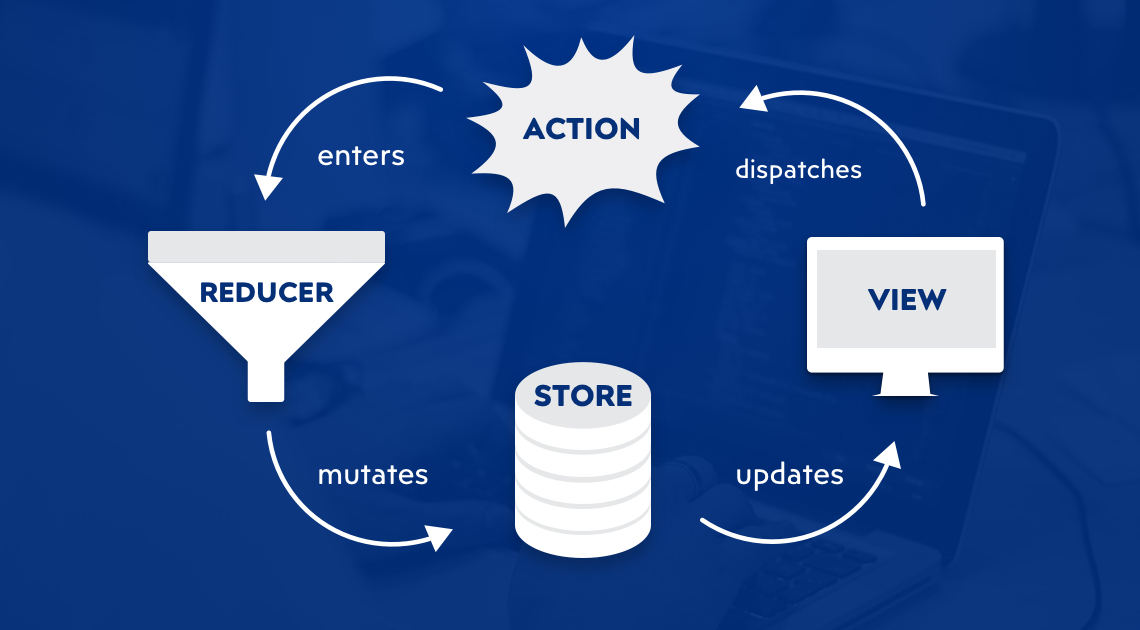
The way these facets of the Redux architecture interact is fairly simple. An action is dispatched into the store by a trigger in the client-side view. The store receives the action and gives it to the reducer, along with the current state. The reducer performs state transformations with regard to the provided action type, and in doing so returns a new copy of the state. The store takes the new state and makes it the current application state, after which it notifies all store subscribers that a change has occurred. The subscribers update the view according to the changes, and the cycle can begin again.
This type of data flow is called a strict unidirectional data flow. Everything that participates in the Redux lifecycle becomes a part of this flow, from beginning to end, which makes the application much more predictable and – by extension – testable.
Now that we took a brief look at how Redux works, we can begin creating our own copy of it and see how things behave in practice.
Using Redux in an example project
Let’s consider a simple counter. The counter is made up of two buttons – one for increasing, the other for decreasing the counter value – and a counter display. Clicking the buttons should therefore change the value, and the value change should be immediately visible.
How can we make such a counter work?
Keeping track of the counter value by way of an HTML element would tie the application state to that element, making it our “source of truth” for the counter value. But what if the counter and its controls are displayed multiple times on the same page? The application would then have multiple sources of truth for the counter value, which would be increasingly difficult to keep in sync as more and more counters are added to the page.
We can keep the counter value in a global variable, but that comes with a different set of problems. Mutable global variables are unreliable since virtually anything can cause their values to change. Also, upon effecting the change, all elements that use the value should somehow be notified of its mutation. The more we add to such a system, the harder it becomes to reason about the way it works and who participates in it.
Redux suggests to keep the counter value (our application state) in a central application store – a single source of truth – and to use the buttons to trigger actions which mutate the store, and with it the application state. Elements that make use of the stored data then opt into the process by becoming store subscribers, having their listener functions called whenever a new action is dispatched to the store. Let’s give it a try.
The view layer of an application is generally what triggers store changes – and with it an update of the view layer itself – so we’ll begin our exploration of Redux by taking a look at actions.
Understanding Redux actions
Looking back, we posed that state changes are triggered by actions. The counter should change its value (the application state) when the buttons are clicked (the actions are triggered). Since one button is intended for increasing, and the other for decreasing the counter value, two actions can be defined: increment and decrement. These will be the counter action types.
Once the action types have been defined, the action creators can be written. Action creators return an object with an assigned action type and an optional payload. The action type is used to identify the type of action that has been dispatched to the store, and the payload is made up of any and all data that might affect how the stored state is changed. The two actions that can be created are incrementAction and decrementAction.
Note that we don’t really have to separate action types and action creators in such a way, but it’s good practice to stick to the single responsibility principle. If at some point in time we have hundreds of action types and creators, it would be much more beneficial for us to keep them in their own modules.
With our action types and creators in place, we can begin exploring how these actions affect the store, and with it the application state.
Introducing the Redux reducer
We said that when an action is dispatched to the store, a reducer function evaluates it against the current state. If the reducer recognises the action, it will modify the state accordingly and return the modified state to the store. Otherwise, it will simply return the state it was initially given.
With that in mind, we will define our initial state as an object with a counter property set to 0. This is what the state handled by the reducer will look like.
But before moving on to the reducer function, let’s take a look at how each action we previously defined affects the state. We’ll define two handler functions, one for each action type, and we’ll have those functions work with the current state and dispatched action to return a modified state.
Handling the increment action means that the counter increases in value, while handling the decrement action means it decreases in value.
Note that we create a new state object and assign the current state properties to it, cloning the state into a new instance. This way we update the reference to the state inside the store, which means that a simple equality comparison of a previous and a next state would be able to tell us that a change has occurred since the last dispatched action.
Now that we have defined how the actions will affect the store, we can go on to define the reducer function and have it use the above action handlers.
That’s it! We have our actions and our reducer, we’re two thirds of the way there. All that’s missing is the store, so let’s go ahead and look at how the store can bring the pieces together.
Creating the Redux store
The store is essentially a wrapper around a reducer (or many reducers) and the application state. At its simplest, the store provides an API for dispatching actions into the store, subscribing store mutation listeners, and for retrieving the stored state. The actual Redux store API can be found here. We will be using it as a guide for our own store implementation.
To create a store, we need to have a reducer and an initial or preloaded state.
We also know that our store API must provide a state accessor. The preloaded state provided to the store constructor will serve as our store’s current state immediately after creation.
Next, we will make it possible to subscribe to the store and react to any state changes. We will need to track all of the subscribed listeners, and also provide each listener with a function with which it can cancel its subscription.
So far so good! The last piece of the puzzle is the action dispatcher. When an action is dispatched, the current state is modified according to the reducer function, and all listeners are notified that a state change has been triggered. We will dispatch an action to initialise the store, in a sense, by passing the state through the reducer for the first time.
Now let’s apply a couple of finishing touches. We will perform some rudimentary error handling for the following cases: reducers must be functions, listeners must be functions, and actions must have a type. Also, if the provided preloaded is a function, we’ll set it to undefined instead.
And with this, our simple copy of Redux is done!
Closing words
In this article, we have only covered the very essentials of what makes Redux tick, but there’s still more that we can do.
We can add support for combined reducers, making it possible to split reducer logic into more manageable parts. We can also add support for applying middleware, which opens up a whole new world of possibilities with simple action logging, async action support, and much more. But we’ll leave that for another day.
Until then, play around with what we’ve made. Think of how you can make your clone of Redux better. Maybe even skip ahead implement those combined reducers! The choice is yours, but keep in mind that it’s always good to take a peek at the official Redux GitHub repository to get some deeper understanding of how things work. And you can always check back with our GitHub repository where this example is covered in a little more detail.
Happy coding!