Laravel practical guide for using XAMPP
In this tutorial, I will explain how to start writing your own API using Laravel as backend language and XAMPP platform.
It will help you in your web development projects and also sharpen your developing skills.
Let’s start!
Setting up the environment for Laravel
The first thing to do is to download XAMPP. I am not going into detail about downloading and installing XAMMP since this information are described on XAMPP web page and it is really simple btw.
Virtual hosts
After XAMMP is downloaded next thing to do would be to set up a virtual host on XAMPP. On the internet virtual host is the provision of Web server hosting so that a company doesn’t have to purchase and maintain its own Web server and connection to Internet. It is just another name for shared hosting.
In this lesson we are going to set up a local virtual host using XAMPP.
Why are virtual hosts important in terms of API’s?
Imagine that you run Twitter-like site with thousands of users in the database. It is possible for users to publish statuses, follow other users, unfollow other users, edit their information…
And after a while, you want to expose API for that website, so that users can make for example an Android app that will consume that API.
So if your website is www.fakeTwitter.com, wouldn’t it be cool to have your API on subdomain like this: api.fakeTwitter.com.
Setting up the virtual host in XAMPP is really simple:
The first step is to open Notepad (or any other text editor) in administrator mode, and navigate to C:\Windows\System32\drivers\etc and open hosts file for editing. Hosts file is an operating system file that maps host names to IP addresses. We should add a line:
127.0.0.1 api.fakeTwitter.com (or any other name that you would prefer more)
Now the domain api.fakeTwitter.com will point to our localhost IP address.
Next thing to do is to set up virtual host in XAMPP configuration, for that need we should navigate with our text editor to {your_XAMPP_direcotry}/apache/conf/extra/httpd-vhosts.conf. It should look similar to this:
As you can see there is already one virtual host (localhost) set by default, using the same principle we will define our custom virtual host. So our new rule would look like this:
ServerName key is that tells Apache server under which name this server should be available, additional names can be given with the ServerAlias directive.
DocumentRoot and Directory keys are pointing to the code location, and code between Directory marks are .htaccess directives.
Important thing to notice is that Directory keys are pointing to public folder of our project, public folder is the entry point for every Laravel app. This code is appended to the end of vhosts file. After resetting Apache on XAMPP our virtual host with sub domain should work.
Usually we would access our API using localhost/apiFaketwitter/public/index.php, but after this update just api.fakeTwitter.com would be enough. Really neat, isn’t it?
Installing Laravel
Installing Laravel is really simple, but you will need Composer to get it work. After installing Composer navigate to the project folder inside XAMPP’s htdocs folder using Command prompt and execute command:
composer create-project –prefer-dist laravel/laravel fakeTwitterApi
And this is basically it, Composer will download Laravel and set up autoloading and Artisan which we will discuss later.
Now we have virtual host and Laravel completely set up and running, it is time for actual designing of our API.
Practical guide to designing API’s
Defining resources and designing endpoints
When developing API it is mandatory to make API specification before the development process itself. A good starting point for writing specification is defining resources and endpoints (routes).
Resources
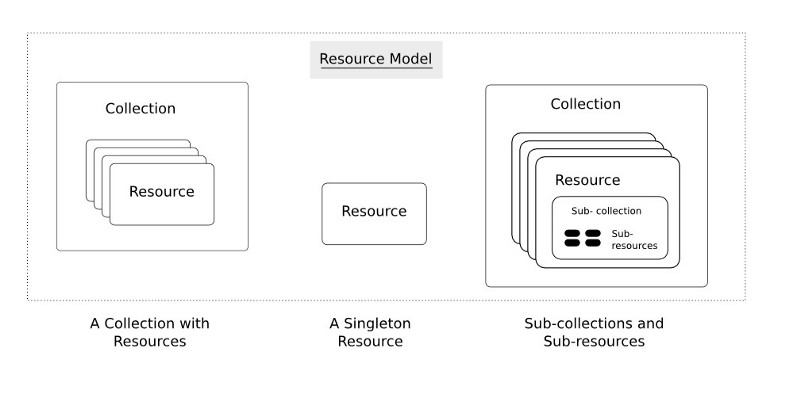
Resource is a fundamental concept in REST API. Resource identifiers (URI), resources representations, API operations are all built around concepts of resources. Resources can be grouped into collections. Each collection is homogeneous so that it contains one type of resource. Resources can also exist outside collection, these resources are called singleton resources. E.g. resource “user” would be singleton resource and “users” would be a collection. On top of that collections can be contained inside a singleton resource. In that case we refer to these collections as sub-collections. Sub-collections are usually used to express some kind of relationship.
Nouns are good; verbs are bad
Number one principle in designing RESTful API’s is keep your URL simple and intuitive. Simple and intuitive base URL design makes using your API easy. Another thing to mention is to keep verbs out of your base URL.
Also one important rule is that we have two base URL’s per resource. Let’s say we have User resource, first URL is for collection; second URL is for specific element in collection.
/users /users/{id}
Boiling it down to this level will force verbs out of our base URL.
HTTP verbs
HTTP defines methods (verbs) to indicate the desired action to be performed on the identified resource. Most commonly used HTTP verbs are POST, GET, PUT, PATCH and DELETE. These correspond to create, read, update and delete (CRUD) operations. There are a number of other verbs, too, but are used less frequently.
- POST – used to create new resource. On successful creation, returns 201 status code (created).
- GET – used to retrieve or read a representation of resource. Method is considered safe since it doesn’t change resource state. Returns 200 status code (OK) is successful and 404 (not found) or 400 (bad request) if not.
- PUT – used for updating resource when the whole representation of resource is updated. Returns 200 status code (or 204 if not returning any content in the body)
- PATCH – also used for updating resource, but only partial representation of resource. Unlike PUT which updates whole resource, PATCH method only updates specific information.
- DELETE – used to delete resource identifier. On success it returns status 200 along with response body or 204 (no content) with no response body.
Problem
Many Web API’s start by using a method-driven approach to URL design (wrong!). These method-based URL’s contain verbs either on the beginning or at the end. The URL for User resource might end up looking like this:
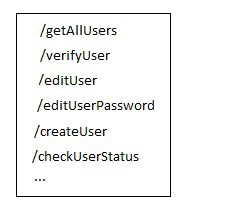
Very soon you can have a long list of URL’s and no consistent pattern.
Solution
For our user resource, we have two base URL’s that use nouns as labels, and we can operate on them using HTTP verbs.
| Resource | POST create | GET read | PUT update | DELETE delete |
|---|---|---|---|---|
| /users | Create new use | Get users | Bulk update users | Delete all users |
| /users/{id} | – | Get one user | Update one user | Delete one user |
Looks much better and simpler than the method-driven approach on designing URL’s.
The starting point in selection of resources is to analyze your business domain and extract the nouns that are relevant to your business needs. For example, using nouns we can identify resources such as Post, Tag, Comment in blogging domain. Once the nouns have been identified, then the interactions with the API can be modeled as HTTP verbs against these nouns.
Singular VS Plural
There is much debate going on the Internet how to format resource nouns or in other words should resource names be in singular or plural. There are good arguments on both sides, but commonly-accepted practice is to always use plurals in node names. Using this rule you can structure your endpoints (routes) like this:
GET api.fakeTwitter.com/users – gets all users
GET api.fakeTwitter.com/users/{id} – gets user by id
GET api.fakeTwitter.com/users/{id}/tweets – gets all tweets by the user with id
GET api.fakeTwitter.com/users/{id}/tweets/{id} – gets tweet by id from user by id
It is recommended not to exceed nesting level of two resources.
There are also cases where pluralization doesn’t make sense. It is completely acceptable to use the singularized resource.
Resources needed for our example
I will try to keep our example as simple as possible for learning purposes. So the resources needed for our API will be: Users, Posts, Comments.
This is the end for this lesson, stay tuned for next chapter where we will dig a little bit deeper into endpoint design and definition along with relationships between resources.