How to successfully use wkhtmltopdf in Pimcore: Hidden obstacles
You've received a last-minute request from the client that has a website revolving around the UEFA European Championship - and it's up to you to enable the client to create small flyers about host cities of the Championship.
So you think to yourself in Clarkson's voice: “Alright, I can handle this, I have a lot of experience, and besides”

And the task continues - You'll need to make an HTML template, enrich it with CSS and use wkhtmltopdf to generate what the client wants. He has to be able to drop the objects inside the renderlet. And, by the way, wkhtmltopdf does not support CSS3”.
Now, that changes a lot of things and what you have thought about the task. But, worry not, we’ve got you covered.
We have a perfect guide for you. We will show you how to set up everything you need to make this possible. To be able to make a flyer, the only prerequisite is that you have installed Pimcore on your machine. This article was made with the assumption that you do have that because you are working on a project made with Pimcore.
But if that is not the case, we've got you covered for that as well - just visit our post on learning Pimcore with practical examples for beginners and follow the instructions.
What to expect from this guide?
By the end of this guide, we expect that you will be successful in making a flyer, catalog, or whatever you need - and that this post will provide you with all the necessary information. You'll know exactly how to use wkhtmltopdf in Pimcore to create any kind of PDF document you need.
Project overview
With the assumption that you have Pimcore installed on your machine, we will continue with the steps needed for our project.
We should start from the beginning, and to be honest, you can choose your starting position because there is more than one possible point to start with.
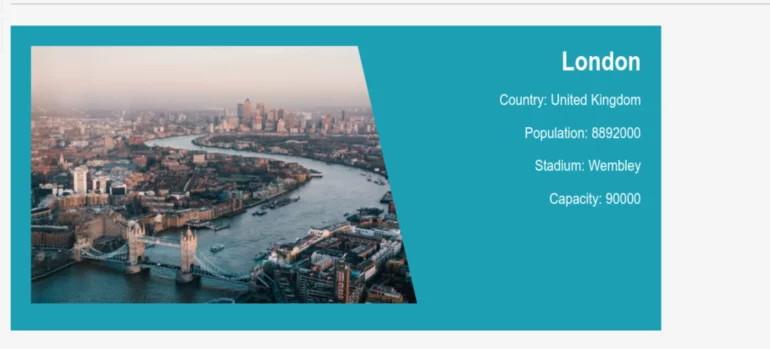
Your client has a lot of trust in you and he told you that you can do the design as well. For the sake of this tutorial, we think that something like this will serve its purpose.
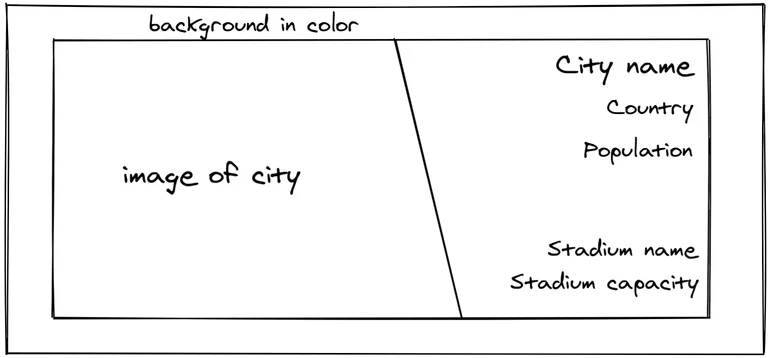
We’ve made this in Excalidraw which is a “virtual collaborative whiteboard tool”. We tend to use Excalidraw when we want to sketch something really quickly and get going.
As you can see, the design is very simple. We have 1 photo and 5 pieces of information about the host cities, and all that has a wrapper around it.
Before we use wkhtmltopdf in Pimcore, we'll need to create an object.
Creating an object in Pimcore
The next step is creating our class and the object inside the Pimcore administration.
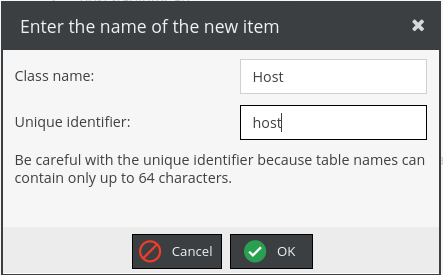
Go to Settings -> Data Objects -> Classes.
Here we will make a class that will describe our host cities. Click on the "Add" button and give your class a name and unique identifier. We choose this to be “Host” but you can go with whatever you want.
Next, right-click on “General Settings” and choose Add Layout Component -> Panel.
After that, right-click on “Panel” and now you want to add data components. We went with:
- Media -> Image
- Number -> Number
- Text -> Input components
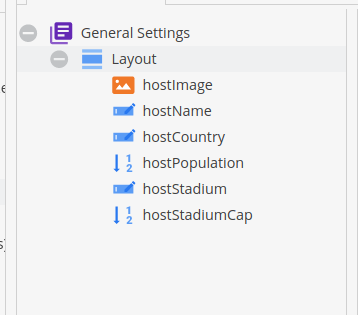
This is how the Host class looks in Pimcore administration.
Inside Data Objects we made a UEFAhosts folder, and now we can right-click on Add Object -> Host.
We added an image and the rest of the data in the object!
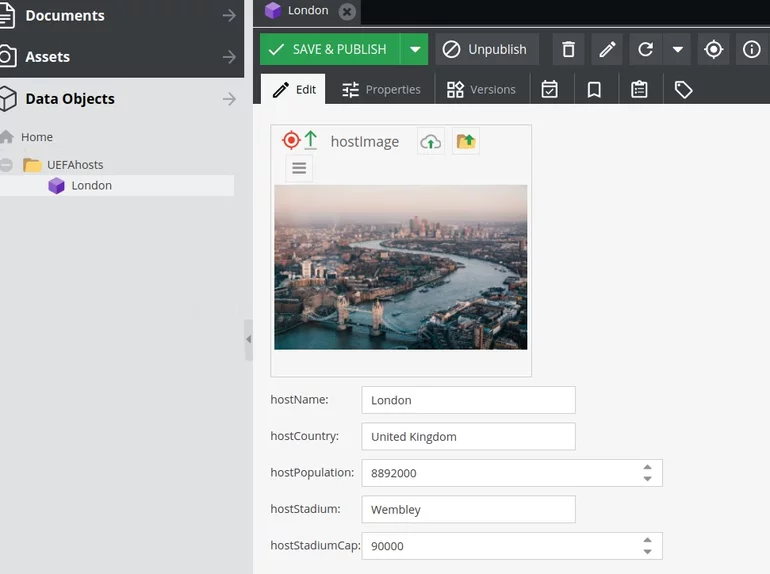
For the image, we used a free one we found on the Unsplash website.
Ok, so far so good. We believe that this part won’t pose any problems and that you will be successful. In the next chapter, we'll have everything prepared to use wkhtmltopdf in Pimcore properly.
Templates and controllers
Next up are templates and controllers. This is the trickiest part of this tutorial so…

Let’s start with the templates. To be clear, this part is done inside your favorite code editor.
The first one is “print_catalog.html.twig”. You can place it in ‘app/Resources/views/layouts’.
Just create a standard HTML file with head and body, and content block in the body.
Don’t forget to link the CSS file in the head. We've placed the CSS file inside a static folder, but in this case, we could have written those styles inside the print_catalog template. If you see the benefits in using some preprocessors, you should use them, otherwise not.
Next up - create a web2print folder if you don’t have it already: ‘app/Resources/views/web2print’ and make default.html.twig which extends the print_catalog and includes default_no_layout template in it.
And that’s pretty much it. Nothing to add here.
Now comes the template where we are going to include pimcore_areablock so we can throw some Areabricks in the mix. It should be placed inside the web2print folder you created on the first step.
Now we should create a renderlet areabrick in Areas folder ‘app/Resources/views/Areas/print-host-areabrick/view.html.twig’.
The folder name for the Areabrick has to be the same as in the areablock. We'll use this renderlet so we can just drop the city host data object to get our flyer inside the Pimcore administration.
And every Areabrick must have a controller which you put here: ‘src/AppBundle/Document/Areabrick’. We are making PrintHostAreabrick.php and this is the code for it:
We are getting close with this one.
Now, in ‘app/Resources/views/web2print’ create a template that has the same name as the action in the pimcore_renderlet.
In this case, it is print_host.html.twig and this is where we will type HTML for our flyer. Like we said before, we kept it simple so don’t trap yourself thinking this is the best you can do with this technology.
You can create multi-page flyers, catalogs, and other types of content. But in the end, you will use the same code as we did here. Don’t forget that with wkhtmltopdf you can’t use CSS3, so for more complex designs, you should use tables such as div tables.
This snippet begins with a check for the object ‘host’. If there is any then we will display its properties in the template. As you can guess, the CSS is also not too big for this.
Don’t forget that you can use Pimcore thumbnails when generating web2print documents. If you are not familiar with thumbnails, learn more in our detailed article on how to use Pimcore thumbnails successfully!
Some of you might have problems locally when loading some extra fonts. Wkhtmltopdf does not recognize that two fonts are different if they are from the same font family.
In that case, you should give different font family names to different fonts. There is one more way to solve this problem and the solution will be at the end of the document.
Here is CSS for the template made for this article.
On lines 50 and 55 you can see the fonts we used and how we gave them different font family names so both of them are displayed properly.
We wanted to use some more appropriate fonts for this flyer but we also wanted to show you how to handle the case when fonts are not working as expected. We'll go deeper into this at the end of the article.

And we have saved the best for the last - web2print controller.
For this, we need the defaultAction and action for our print host. We can actually use slightly modified defaultAction from the Pimcore demo project. You should check out that project if you haven’t so far because you can see just how powerful Pimcore can be.
And the other controller (‘printHostAction’) will be used to get the data.
Rendering PDF
Alright, finally we have set up our project and we can make some flyers. And if you went in the Pimcore administration right now and dropped an object in renderlet, you would get something like this:
Our flyer is on A4-sized paper and that’s not what we want! We need to use additional wkhtmltopdf settings.
These are the additional settings we have to use.
Let’s start with the right orientation. Since our flyer will be wider than it's higher, let’s put it in landscape orientation. Now things are in reverse order so when we put --page-height it will actually be the width.
In some cases, wkhtmltopdf will perform smart shrinking which can modify the pixel/dpi ratio and that's a big no. So if you don’t want such wkhtmltopdf to do that, make sure to use --disable-smart-shrinking.
After that, you can see 4 rows of margin declarations. Those are margins of a PDF document, the same you have when typing Word documents. If you don’t want them, put them at 0mm.
Solving obstacles
In the last code block, we had a look at wkhtmltopdf settings, and we owe you to explain the last one. The last one is necessary when you are putting your project on a real server. On a real server you might experience issues loading images and fonts as we did during the development.
The thing is that different modes read files differently.

As you know by now, there are three modes in administration: Edit, Preview and Generate & Preview PDF. In the next code gist, we'll show you a solution for the first two modes, and a solution for the third one.
So the first case is the usual case and we believe there is nothing to add about that.
The second one is for generating and previewing PDF and it works totally differently. To display photographs, you need a file system path and thankfully - Pimcore got us covered there.
This time we will display the image as a div background. To have a nice-looking background, style it in CSS and your results should look the same as before.
Also, it's possible to use Pimcore thumbnails for this as well.

Now, just like photos, the aforementioned solution for the fonts might not work when code is run on a server. For that case, we will use FontForge - font editor. In our case, we just need to rename the font family using FontForge.
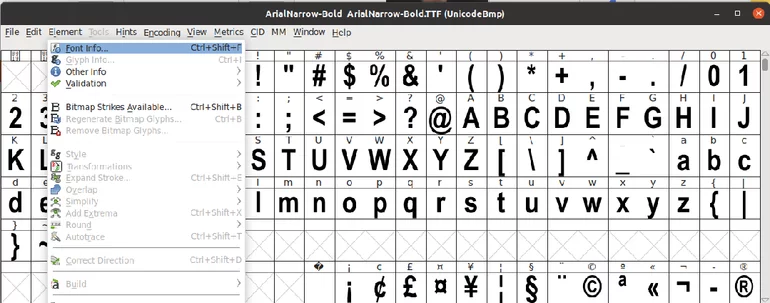
When you open the font, click on "Element" and then click on "Font info".
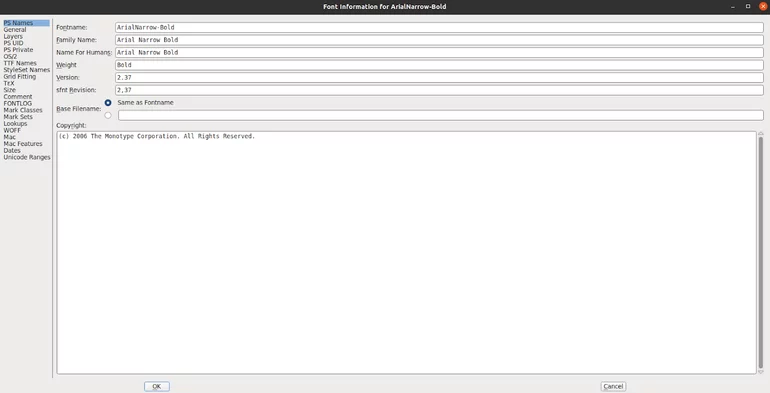
Navigate to the 'PS Names' and under “Family Name” enter your custom name. But don’t close this yet. Next up are TTF Names.
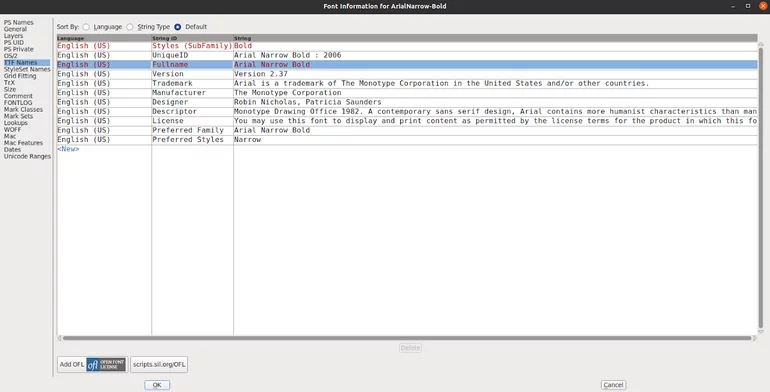
Over here you will change Fullname and Preferred Family to the name you chose in PS Names. And with those settings, your fonts should be displayed properly.
What are your thoughts on using wkhtmltopdf in Pimcore?
We've experienced firsthand how difficult wkhtmltopdf can be to work with, but once you get some experience with it, you'll realize that it's an awesome tool for developers.
We hope that this article was of great help and that you'll email us examples of how you used wkhtmltopdf in Pimcore projects! If you have any questions regarding using wkhtmltopdf in Pimcore, we're always happy to help! Just shoot an email at hello@factory.dev or contact us through our contact page!
And if you think we left out something important, please let us know! We're always open to improving and updating our content, and by doing so, we'll help other developers nail down all their tasks!
To learn more about Pimcore and its numerous features, tools, and everything Pimcore-related - visit our Pimcore Knowledge Base! From short guides to video tutorials - you'll find everything you need!