Introduction to GraphQL using Pimcore DataHub
GraphQL has undoubtedly changed the way we think about APIs. Ever since 2015 — when Facebook released it publicly by providing a specification document and a GraphQL runtime reference implementation in JavaScript — GraphQL has grown in popularity.
Nowadays, versions of GraphQL runtime have been built in all relevant languages. Not to mention that many development platforms, including Pimcore, have developed GraphQL API support for their systems. In this article, we will explain the core concepts of GraphQL by example — using Pimcore DataHub.
Get to know Pimcore DataHub
As described in Pimcore documentation, Pimcore DataHub is a data delivery and consumption platform which allows the integration of Pimcore into other systems and services.
With simple and easy configuration, it enables access and management of digital data — including documents, assets, and objects — using the GraphQL query language. To explore and test GraphQL requests, it integrates a feature-rich GraphiQL editor, which will be used for all our examples.
Before we start with the DataHub setup, let's go through the core concepts of GraphQL.
GraphQL core concepts
By the official definition, GraphQL is a query language for your API, and a server-side runtime for executing queries using a type system you define for your data. To get a better understanding, we'll break down the definition while providing examples from our Pimcore system.
Query language
First of all, GraphQL is a query language that enables clients to get the data in a simple and self-explanatory way. To get the information, the client makes a request to a single endpoint by sending a GraphQL query — specifying the needed data.
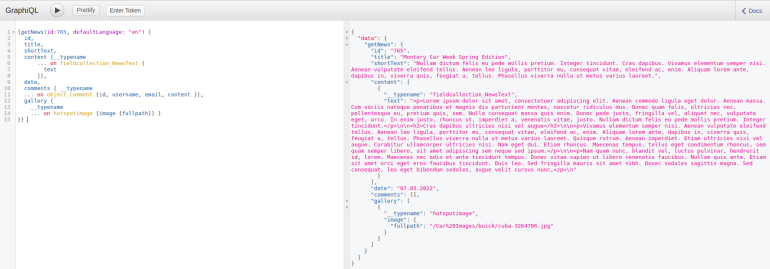
GraphQL can be used for both reading and modifying data. For reading the data, we use query request type. For example, this is the GraphQL query for fetching single news information from our Pimcore system.
Also, if we want to modify the data, we use mutations. For example, this is the mutation query for creating a comment.In this query, we are requesting the id, title, shortText, and date of the single "News" object by providing the news identifier. Additionally, we are providing a defaultLanguage parameter for specifying the desired language. The GraphQL runtime accepts the request and responds with the exact same data response. Therefore, the GraphQL query is like a blueprint of the response, which makes it really easy to know what data to expect.
In this example, we are first setting the required Pimcore system values for creating an object — parentId and key. By setting the parentId value to the news id from the previous example, a comment will be created as a child of the specified news, while the key will represent the name of the comment object.
We also want our comment to be published right away, so we set Pimcore's published property to "true." The next step is to define that comment is related to the news object with the specified identifier, and we set the content of the comment. Additionally, we are specifying what information we want to be returned in the response.
You can notice that comment data is set as the value of the input property, while in the output property — we define what comment data we want to get in response.
As you may have already detected, the response data is returned in widely-used JSON format, although different GraphQL runtime implementations can choose another data communication format — such as XML. You can see that GraphQL query language is quite straightforward, and from the query request, we can already know what data to expect.
So, now that we are familiar with the query language, we can check how the GraphQL runtime handles requests.
GraphQL runtime service
To be able to get a response, GraphQL needs a runtime service. In other words, there must exist a server-side implementation that exposes data as a GraphQL API. When developing your own GraphQL service, you can already use one of the existing GraphQL implementations available in the programming language of your choice.
Internally, Pimcore DataHub uses webonyx/graphql-php — a PHP implementation of the GraphQL specification. The existing GraphQL implementations take care of the common things like parsing, validating, and executing GraphQL requests, so you can focus on writing the two main parts of the GraphQL server: a schema and resolver functions.
Schema and type system
Unlike implementing specific endpoints, the GraphQL service is more focused on describing the available data. What can be used in a query is defined and described by the GraphQL schema.
In Pimcore DataHub, you can configure a GraphQL schema through a simple user interface that will be shown later in the article. In the background, Pimcore generates a schema and stores it in the /var/config/datahub-configurations.php file.
However, to examine what is available for querying, every GraphQL server has a built-in introspection system that provides the ability to browse over its schemas. For example, having the "News" schema defined, the following query will show all the types that the schema supports:
The response on the right side displays the stripped version of the actual response. If you run it on your Pimcore system, you will also see some more Pimcore-related fields, such as classname, children, parent, etc.
Anyway, you can see that the GraphQL schema contains a list of fields with defined types. Feel free to play around in your GraphQL editor to try more introspection queries. For further information, you can also check out the official GraphQL documentation.
Resolver functions
Once a schema is defined, there must be an implementation of how to get the actual data. To be able to do that, each field in the GraphQL schema is backed by a resolver function.
In case when the resolver function is not given — a GraphQL implementation has a built-in default resolver that takes the property on the root object with the same name as the field. In the context of Pimcore, DataHub has implemented resolvers for most of the Pimcore data types. If you need to add a custom query data type, you can refer to the Pimcore Documentation.
In general, when a server receives a request containing a GraphQL query, the related resolver functions get called. Each resolver function is provided with a context object containing all relevant information needed for resolving the data. Based on the context, the resolver functions translate the query into a language that the data storage engine can understand and return the data in a response. Finally, the response data gets transformed into some data communication format, like JSON or XML, and returned back to the client.
Now that we understand GraphQL, let's use Pimcore DataHub to expose the GraphQL API for a simple news app. To follow along, we assume that you have a basic understanding of core Pimcore elements, particularly objects. If you are new to Pimcore, we recommend that you first read our blog post "Learning Pimcore with practical examples for beginners."
News GraphQL API with Pimcore DataHub
DataHub has been available in Pimcore since version 5. However, to follow along, we recommend installing the 10.x version. We will be using the Pimcore demo application, but you should be able to use any other Pimcore installation.
To provide a GraphQL API for a simple news app, we will expose a GraphQL endpoint for reading news and creating comments. Before we start, make sure you have DataHub installed and enabled.
Installation
DataHub is built on top of Pimcore and comes in the form of a plugin. If you are using the Pimcore demo, you should already have Pimcore DataHub installed and ready to use. Otherwise, you can simply install it via composer.
You can find the installation process already described in Pimcore documentation and our Pimcore Data Importer guide that explains how to use the data importer extension — which adds import functionality to Pimcore Datahub. When everything is installed and activated successfully, you will see the Pimcore DataHub icon in the menu.
Having DataHub ready to use, we can start working on our GraphQL API. However, before we step into the DataHub configuration, we need to prepare our data model.
Preparing the data model
Since we want to enable reading news and creating comments via Pimcore DataHub, we need to have "News" and "Comment" classes defined. When saving a class for the first time, Pimcore will create all required tables in the background — where the news and comment data will be stored. To better understand classes and available Pimcore tables, you can refer to our blog post "Learning Pimcore with practical examples for beginners."
If you are using the Pimcore demo to follow this example, you can reuse the existing "News"class and skip to the step that defines the "Comment." Otherwise, follow the steps below to create a new "News" class.
News class
As in the Pimcore demo example, we are going to store the content of the news using the field collections. Field collections allow us to predefine data sets that can be included in a class. Therefore, before creating a class — create the needed "NewsText" field collection as shown below:
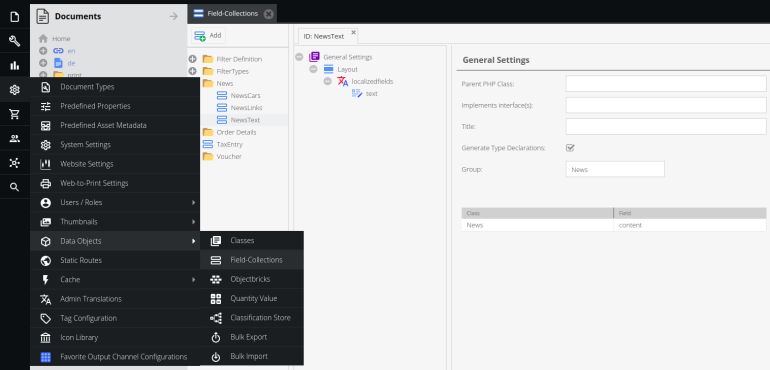
Pimcore demo already contains three types of field collections. However, a single field collection — "NewsText" — will be enough to follow this example. As news content can be multilingual, it contains a field of the WYSIWYG type stored under the localized fields structured type as follows:
-
Localized fields
-
text – Type: WYSIWYG
-
You can create a "News" class when you have the field collection prepared.
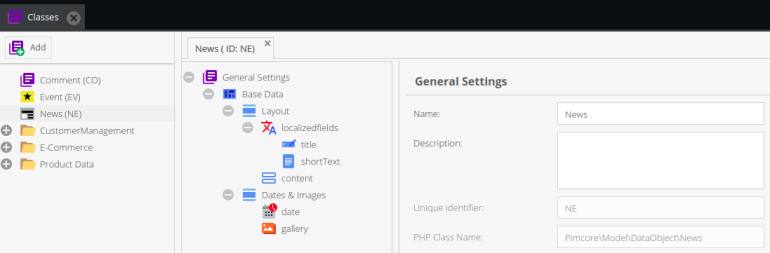
As the image shows, the "News" class contains the fields in the following structure:
-
Localized Fields
-
title – Type: Input
-
shortText – Type: Input
-
content – Type: Field-Collections (with NewsText as allowed type)
-
-
date – Type: DateTime
-
gallery – Type: ImageGallery
Title, shortText, and content are stored under the localized fields structured type. When creating a content field of the type field collection — make sure to select previously created "NewsText" under the "Allowed types" multi-select setting. Additionally, we have the date of the news and gallery field for news-related images.
To have some news for querying, make sure you create some dummy objects of the "News" type under the "News" folder in the "Data Objects" section. You can refer to our Pimcore introduction for more information about creating objects. If you are using the Pimcore demo application, you will already have several news objects created.

Comment class
Once we have our "News" class defined, let's create another one called "Comment" that looks like the following:
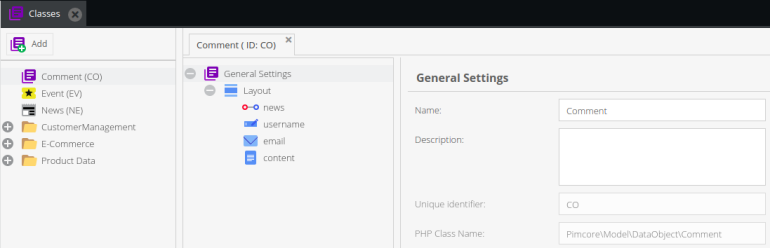
The "Comment" class consists of the following data types:
-
news – Type: Many-To-One relation
-
username – Type: Input
-
email – Type: Email
-
content – Type: Textarea
A comment belongs to the news, so the "Comment" class contains a Many-To-One relation to the "News" type. As we will enable any user to create a comment by providing a username and email, we will also store basic information about the creator of the comment. Finally, we added a content field of the type "Textarea" to store the comment's content.
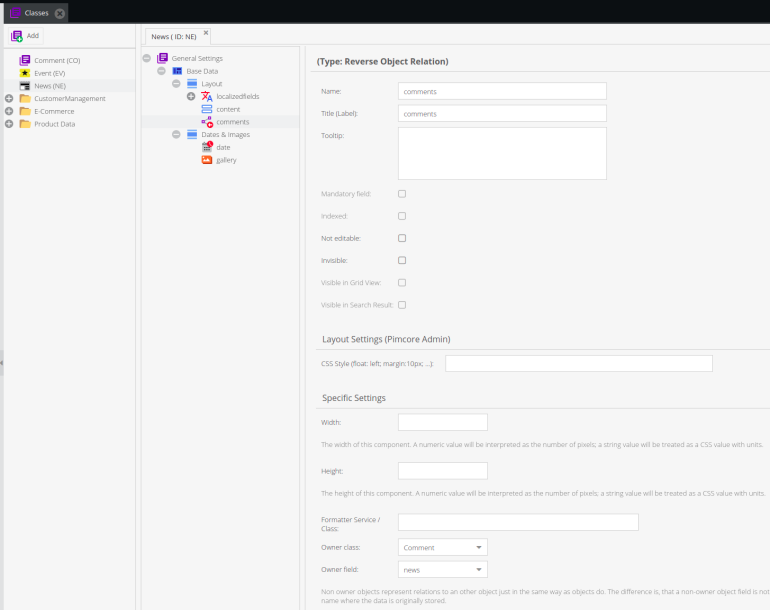
Now that we have the "Comment" class defined, let's go back to the "News" class and add another field of the type Reverse Many-To-Many Object Relation called "comments."
The reverse relation type will enable us to include comments in the GraphQL schema for news. When adding the reverse relation type, make sure to set the "Owner" class to "Comment" and the "Owner" field to the "news" field, as shown in the image below:
Now that both classes are defined, we can expose the news data to the outside world. To do that, we will first configure GraphQL schemas using the Pimcore DataHub.
DataHub GraphQL configuration
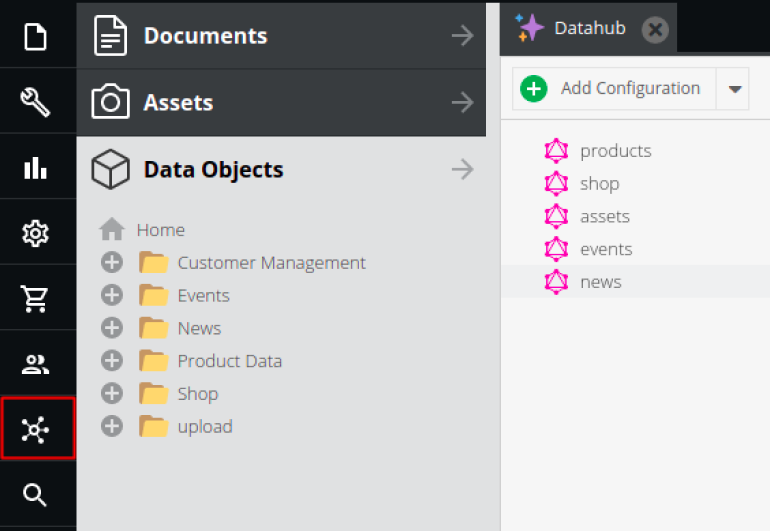
Pimcore DataHub provides a simple and easy interface for configuring GraphQL schemas. First, select DataHub from the main menu — which will open the DataHub configuration UI. Then, select "Add Configuration->GraphQL" to create a new configuration. It will open a small pop-up where you can type the configuration name, in our case — "news."
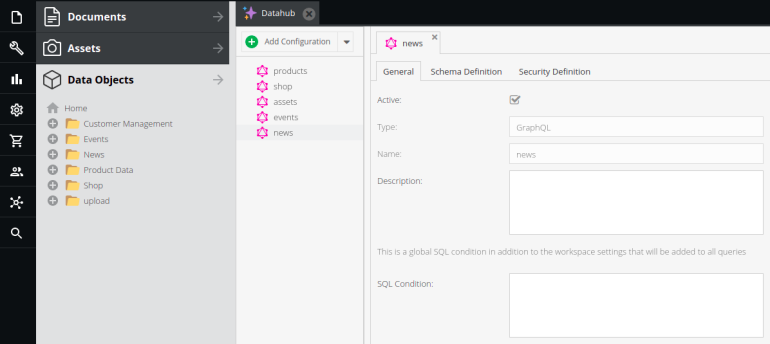
Once created, the "General" tab will be initially shown, and there you can additionally enter a description if desired. Also, you can add an SQL condition which will be applied to all queries. To give you an example, you can decide only to allow reading the news created today by specifying the following SQL condition:
DATE_FORMAT(FROM_UNIXTIME(LastLogin), '%Y-%m-%d') = CURDATE();
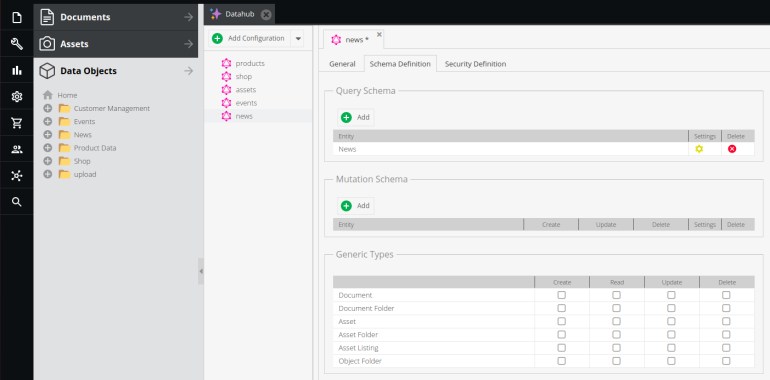
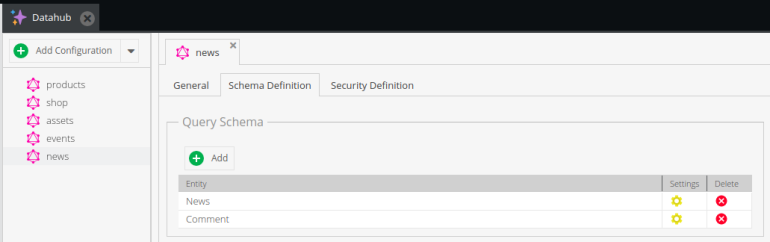
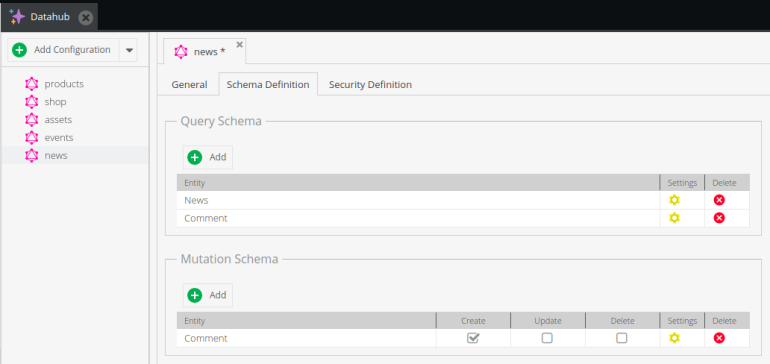
Next, under the "Schema Definition" tab, you can configure the GraphQL query schema for reading the news. In the "Query Schema" section, select "Add." It will open a small pop-up where you can choose the "News" entity for the schema. Once selected, the "News "entity will be shown in the "Query Schema" table.
Then, select the gear icon under the "Settings" column, which will open a pop-up for defining the schema that looks like the following:
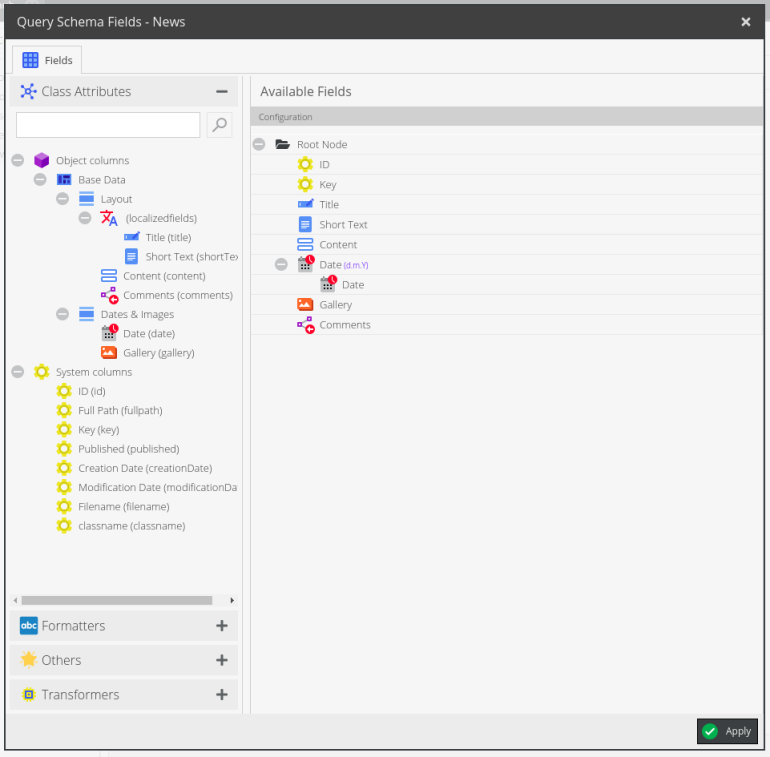
The left column shows all the available "News" type and system columns. To select what data you want to add to the schema and expose via the API, you can simply double click on a field in the left column or drag and drop fields from the left to the right side of the pop-up.
As you can see, we have selected the ID and Key — which are the Pimcore system columns — and then all the other fields we have previously defined in the "News" class. The configuration also supports setting specific query operators for modifying and transforming the data. For example, we have applied special formatting for the Date field to be in "d.m.Y" format. You can find more query operators in Pimcore documentation.
As you may have noticed, we have also selected Comments that we earlier set as Reverse Many-To-Many Object Relation to the "Comment" type. However — to query comments data — we also need to define what fields to expose. We need to configure another schema for the "Comment" entity to do so. Therefore, in the "Query Schema "section, click the "Add" option, and in the entity pop-up, select "Comment" — which will add a new item to the table.
Then, clicking on the gear icon, open the schema configuration pop up for the "Comment" entity and select fields as follows:
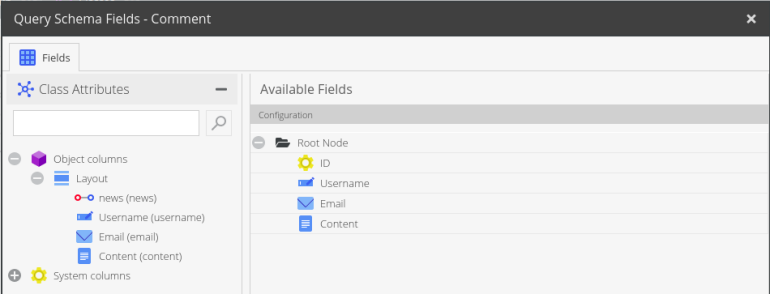
As you can see, we selected ID, username, email, and content. Make sure to save everything, and our query schemas are ready!
Before testing our GraphQL API, we need to configure security settings under the "Security Definition" tab. For now, Pimcore DataHub only supports API key authentication, so click on the lightning icon to generate the DataHub API key.
In order to access the GraphQL API, the generated API key needs to be sent via HTTP headers or query parameters. If you need other authentication methods, you can override the performSecurityCheck method called inside the WebServiceController.
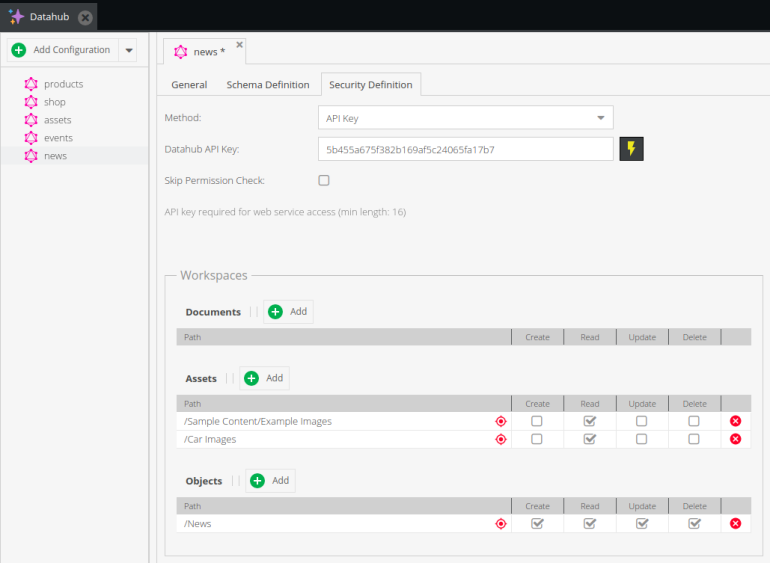
Additionally, under the "Workspaces" section, we need to define which folders can be accessible. By clicking on the "Add" button under the "Objects" section, an empty row will be added to the table. Since we have our news objects stored under the "News" folder, you can drag and drop the folder from the "Data Objects" menu to the path column. Objects outside of those folders won't be found. We are planning to read news and create comments as children of certain news, so check all CRUD permissions for the "News" folder.
Even though we won't focus too much on the assets in this example, you can also see that we set two folders under the "Assets" section and gave it the read permission. Those are the folders where some news images are kept in the demo application. If you have your news images stored somewhere else, just make sure to set the proper folder under the path column so you can query news gallery images.
Testing GraphQL API
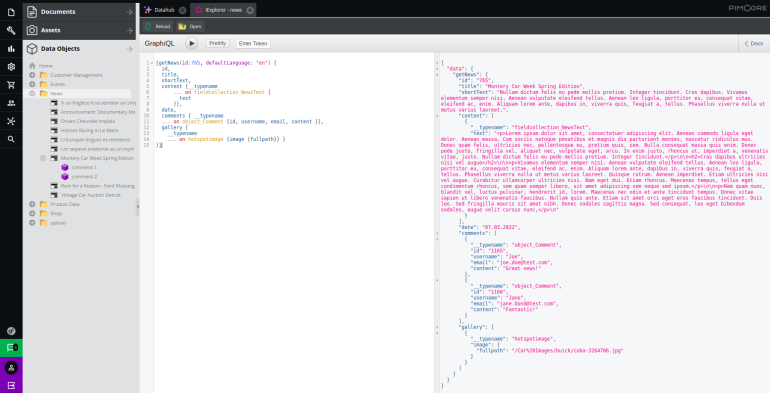
With security settings in place, we can test our GraphQL API using the integrated GraphiQL tool. Open a GraphiQL editor in an Iframe or a separate tab and type in the following query to fetch the last three created news:
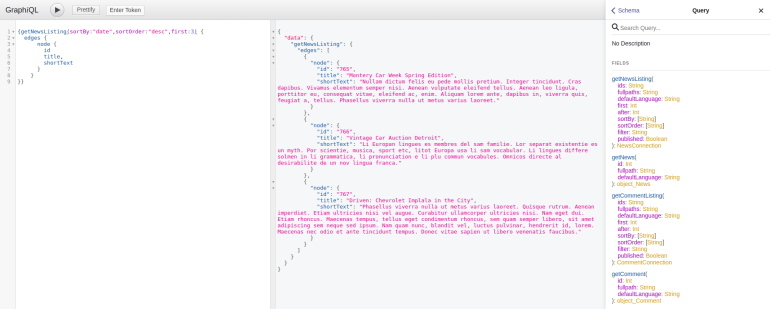
As you type, GraphiQL's IntelliSense provides you with a list of selectable fields you previously defined in the schema. Additionally, there is a sidebar with generated documentation where you can find help when writing queries. All of that is possible due to the strongly type system used to define the available data. By knowing the news identifier, we can fetch single news by ID like the following:
Now that we can read news, we see that our news doesn't have any comments. Let's create them by using the mutation request type. However, to do that, we first need to define the mutation schema for the "Comment" entity to specify which fields are allowed to be set via API.
Go back to the "Schema configuration" tab, and under the "Mutation schema" section, click "Add." In the pop-up for choosing entities, select "Comment." After that, mark the needed create permission for the "Comment" entity.
Then, as you already did for the query schemas, open the schema settings pop up for the "Comment" entity by clicking on the gear icon. Configure the simple schema as shown in the image below:

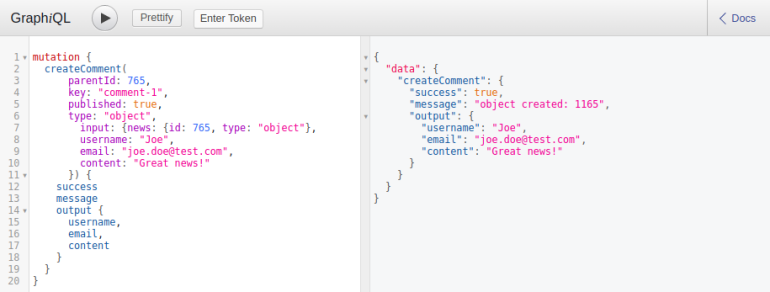
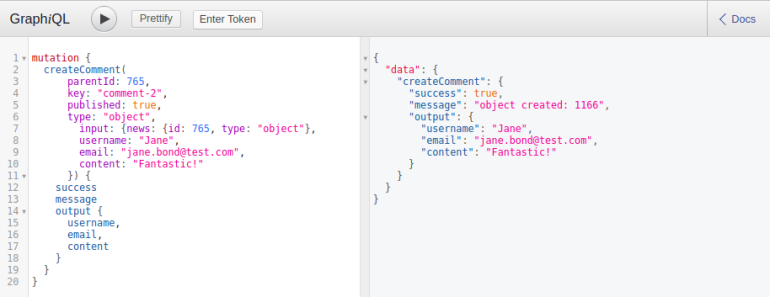
Save the configuration and go back to the GraphiQL editor. You can run the following two queries to create two comments for your selected news. Make sure you replace the news id with your selected news id from the previous news response.
If we fetch news again, we can see that we have successfully created comments for the news.
Also, if we check our created objects in the "Data Objects" menu, we can see the comments are stored as the children of the news.
If you take a closer look at all the used queries, you can see that they also demonstrate how to get localized fields data by providing the desired locale, setting order and limit the number of items, querying relations and image gallery, etc. You can find more query examples in the Pimcore documentation. Play around with the GraphiQL editor and DataHub schema configuration to get a feeling of more query possibilities.
When your API is ready to be used by an external application, this would be the default API route: /pimcore-graphql-webservices/{configurationname}?apikey={yourApiKey}
In our case, the configurationname would be replaced with "news." If you want, you can change the default API route by overriding it in the routing.yml configuration as shown here.
To sum things up
As you can see, configuring your GraphQL API using Pimcore DataHub is relatively easy, as well as querying the data using the GraphQL query language. Hopefully, this article gave you an overall understanding of the Pimcore DataHub and GraphQL in general.
Depending on the chosen client technology — there are many GraphQL tools out there to help you with writing the queries and testing the API. Let's just take an Apollo Client for an example — it's the most popular GraphQL client for integrations to various JavaScript frameworks. Still, you can find a list of more useful libraries and tools here.
We wish you a happy learning journey as you create some awesome GraphQL APIs! Don't hesitate to get in touch if you need additional info or want to find out more about our services.