How to use Pimcore's Data Importer functionality
Data Importer is the official Pimcore extension to its own data hub. It can be easily set up to import data sets from different source types, automated to run at certain times, used to manipulate data entries before they are saved - and all that without writing any custom code!
In the example below, we’re going to show how it’s installed, activated, and one type of simple import which will cover most of its features.
What we have prepared for you
TABLE OF CONTENT
- Installation
- Usage
- Creating configuration
- Import configuration steps
- Looking forward to using Data Importer?
Installation
As the Data Importer requires the Pimcore Datahub bundle and they both do not come with skeleton Pimcore installation, we’re going to install them both using composer. First, let’s install the Pimcore Datahub bundle by running:
composer require pimcore/data-hub
After that, we need to enable it and trigger its integration with the project by running commands:
php bin/console pimcore:bundle:enable PimcoreDataHubBundle
php bin/console pimcore:bundle:install PimcoreDataHubBundle
Once that is done, we can start with the Data Importer bundle. Same way as Datahub, we’re first going to use composer to install it:
composer require pimcore/data-importer
When installed, next up we have to enable it. We can do that also through Pimcore administration as there are few other things we’re going to check. To do that, go to Bundles list in Tools -> Bundles
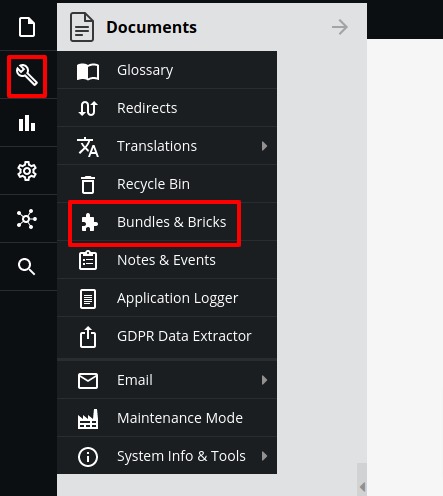
On the bundle list, locate the Data Importer bundle and click + button to enable it. Also, make sure that the DataHub bundle has a higher priority than Data Importer. This is required in order to Data Importer work properly.

After that is done, click on the button above “Clear cache and reload” so that changes to bundles are applied.
Additionally, Data Importer requires few commands to be set in crontab which is used to execute import scripts once they are triggered (more from that later on). They are as following:
Usage
Now that we have everything installed, we’re ready to start configuring imports. To put it in perspective, let’s say we have a data source that is available in JSON format through some API call. In the examples we’re going to show below, we will be using a list of a few countries in that JSON format.
Data model
Before we start, let’s take a look at our Country class that we created for holding some of the data from import.
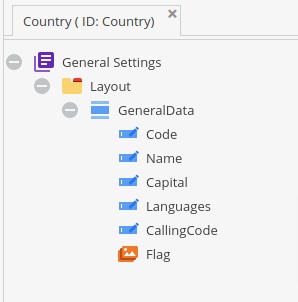
It contains mostly basic text inputs and one ImageAdvanced property which will store the flag of a country.
Alright, now that we know what the class looks like, we can start importing our data.
Creating configuration
First, we need to create an import configuration from the Datahub view.
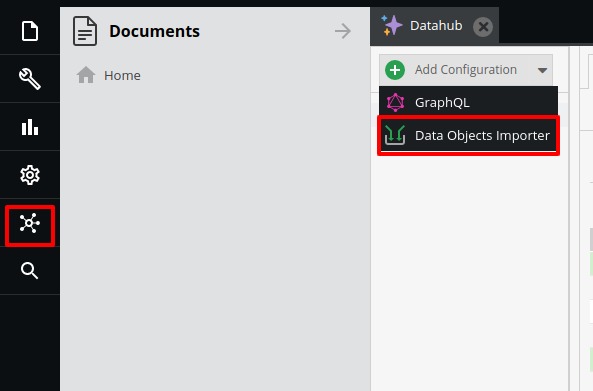
We can name it whatever we want, but in this case, since we’re importing countries we’ll name it CountryImport.
Import configuration steps
General
On the first tab “General”, there is main information about our import configuration.
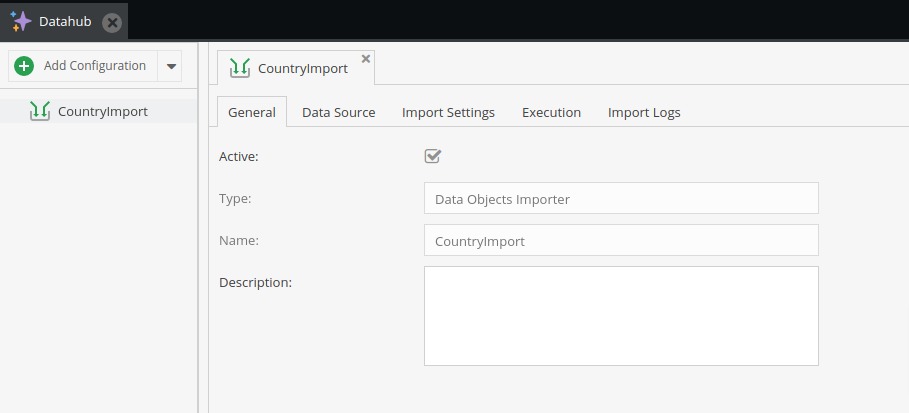
On it, we can change the description and set configuration active or inactive. The active flag is used by crontab scripts which we set up earlier. If the configuration is not active and we entered additional cron execution time, then this import configuration won’t be picked up by the main crontab script - more about cron execution later.
Data Source
Moving on to the next tab “Data Source” where we can specify the location of our import.
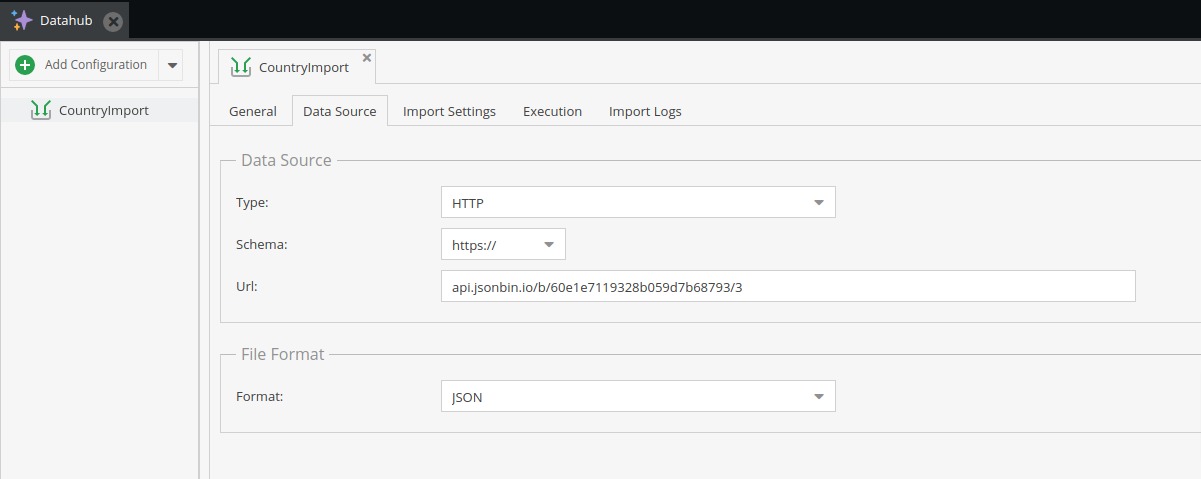
For data source type, we can choose one of the following:
- SFTP
- HTTP
- Asset
- Upload
- Push
SFTP - For this option, we get additional inputs where we can specify host, port, username, password, and path to the file we’re importing. It’s using the ssh2_sftp client to fetch data from SFTP data.
HTTP - On this option, there is a dropdown on which we select whether the source is from HTTP or HTTPS, and input to enter the remaining URL of the source. In the examples below, we’ll be using this as the selected data source
Asset - Using this option, we get many-to-one like relation input to search or drag&drop asset files that are already in the system.
Upload - For this option, we get a file input field on which we can choose a file that will be used on import.
Push - On this option, we do not define source destination, instead here we create an endpoint to which we can submit data. The endpoint will look something like: “http(s)://<YOUR_DOMAIN>>/pimcore-datahub-import/<IMPORT_CONFIGURATION_NAME>/push” and it will be protected with an API key that can be entered on the same page.
The last item to cover on this tab is the file format. We can choose one from:
- JSON
- CSV
- XML
- XLSX
As described above, we will be using JSON in our example.
For testing purposes, you can use the same source as we are using.
Import Settings
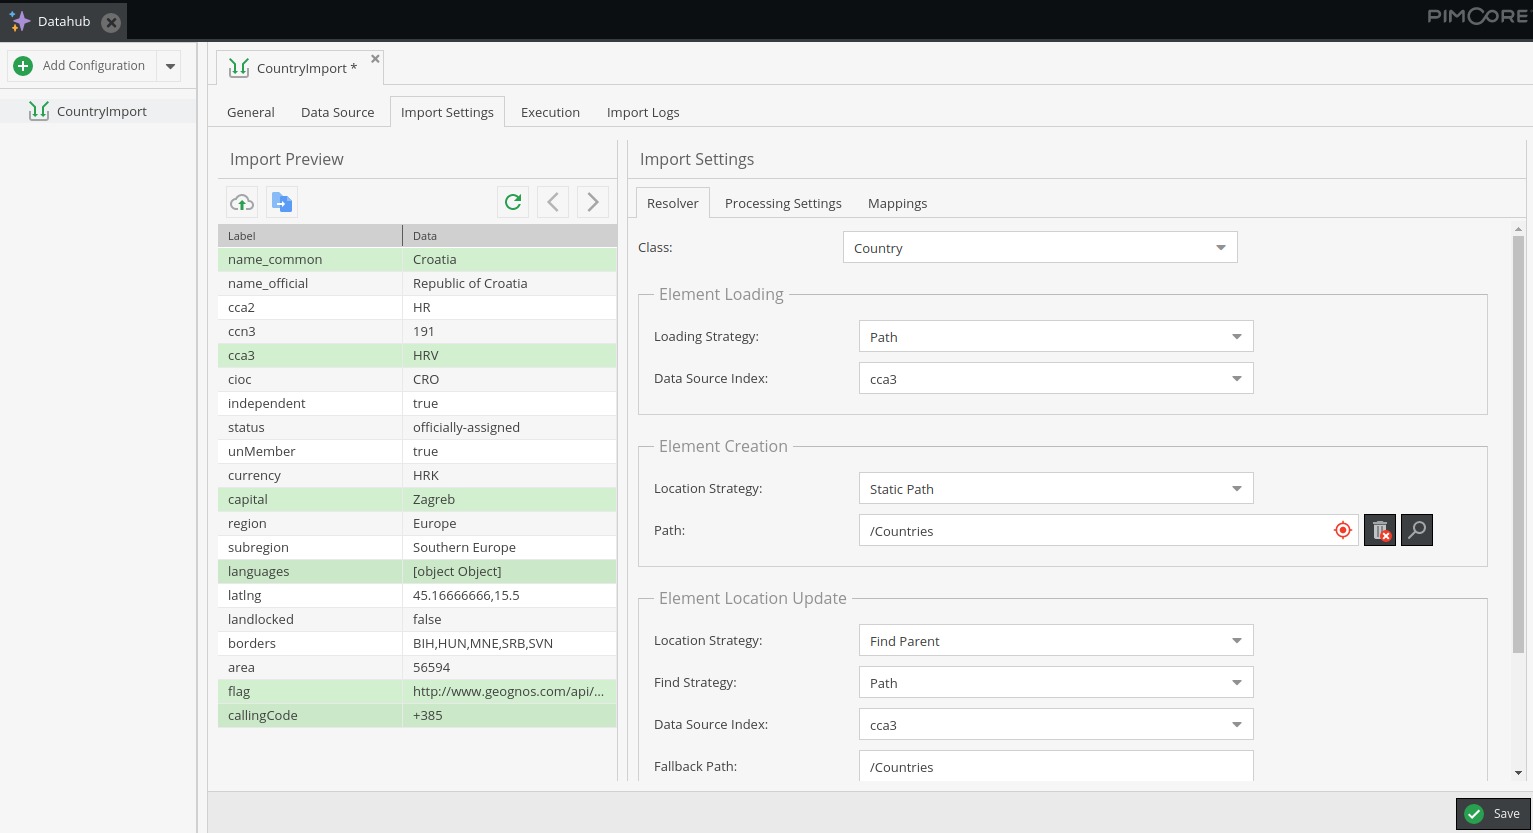
In this step, we’re going to set most of the configuration. Here we can preview loaded source, set resolver strategies, execution types, map source properties to the data object, and more.
Let’s start with previewing our data source. To do that, click on the two files icon (shown on the screenshot below).
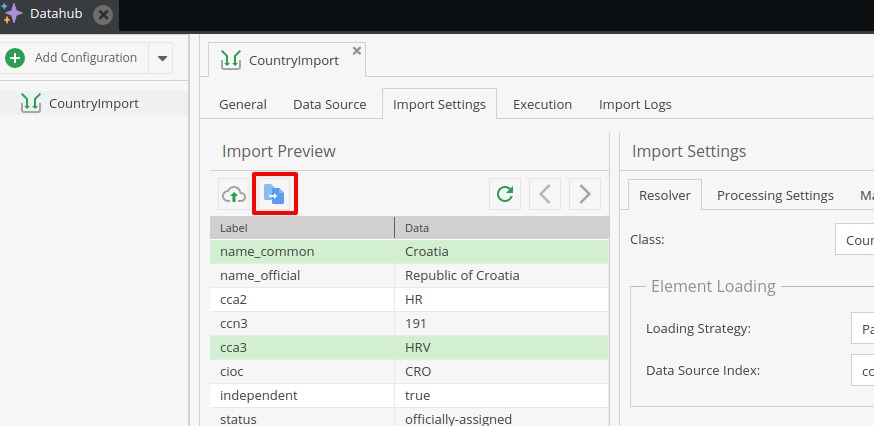
With this action, we can test if we entered the information correctly about the data source and format. If everything is okay, a preview version of the first item will appear below.
Buttons on the right from the selected one on the screenshot can be used to refresh the list and to move on to the next or previous item.
The button left from the one selected on the screenshot is used to manually import sample data for preview - useful when testing the Push source type.
Note that rows marked green on the preview screenshot above are because they are mapped in configuration, but more about that later on.
Resolver
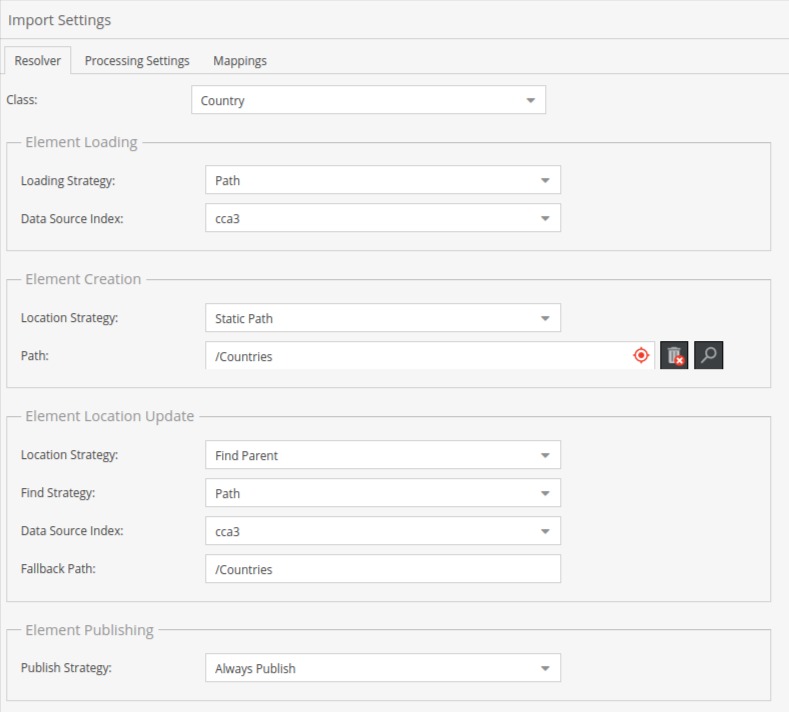
Under the Resolver tab we have several configurations to make, from the top they are:
Class - A dropdown of all classes in the system, here we choose one which will store data from the source.
Element loading:
- Loading strategy - dropdown of available strategies to find existing Pimcore data objects and update them instead of creating new ones. There is also an option “No Loading” which will always create new objects.
- Data Source Index - dropdown of field names which will be used to search existing Pimcore data objects and update them.
Element creation:
- Location strategy - dropdown of available strategies for creating new Pimcore data objects. Available options are:
- Static path - This option adds additional many-to-one relation input where we can drag & drop or search for parent object or folder of newly created objects.
- Find parent - This option enables us to have dynamic locations for new data objects. When choosing this option, three new inputs will show.
- Find Strategy - Similar to the Loading strategy, here we define on which property we should search existing data objects.
- Data Source Index - Same as in the “Element loading” section where we choose property names from the source file.
- Fallback Path - folder path which will be used to store data objects in case the above-configured parent location wasn’t found.
Element location update:
This section defines the same properties as the “Element creation” section does, except they are used only when updating existing Pimcore data objects if it’s found by the “Element loading” section. Additionally to the “Element creation” section, contains one more strategy “No change” which won’t update the parent location of the data object.
Element Publishing:
Here we can define a strategy for setting published state data objects during import.
Those options are:
- Always publish: all imported objects will be published
- Attribute-based: this option shows an additional dropdown with property names from the source which will define whether the object is published or not.
- No change, publish new: If an existing Pimcore object was found, it won’t change it - It will only publish newly created objects.
- No change, unpublish new: Same as option above, only newly created objects will be unpublished.
Processing Settings
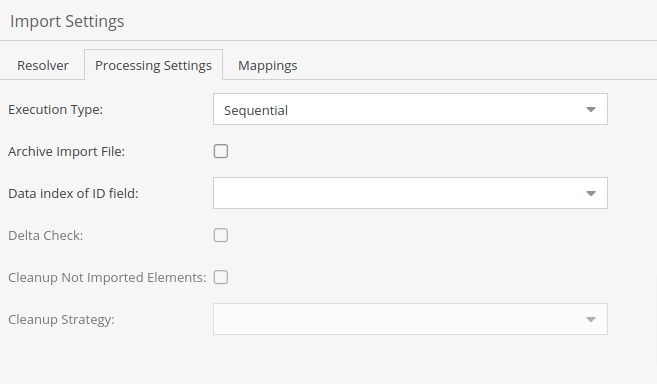
On this tab, we can set more specific settings about import, how it’s executed and what happens after it. Let’s go through them briefly.
Execution type:
- Sequential - Imports data objects one by one from the source - this option is required if there are some objects which require others to be created first.
- Parallel - Imports data objects in parallel batches, it’s faster than sequential type.
Archive Import file - If checked, it will archive the given source with a logged output that happened during the import.
For all the below fields, the data object ID is required. There is a dropdown on which we can choose which property from the source is that field.
Delta check - If checked, the importer will calculate hash values for imported data. It might speed things up when only updating because it will update only those objects that are changed. This option will use additional resources depending on the amount of data to import.
Cleanup - If the Cleanup checkbox is checked, depending on the selected type in the “Cleanup strategy” field, data objects which are not in the source file will be unpublished or deleted. Use this option carefully as it may delete all data objects if used improperly.
For our example, we’re only setting here execution type to “Sequential”.
Mappings
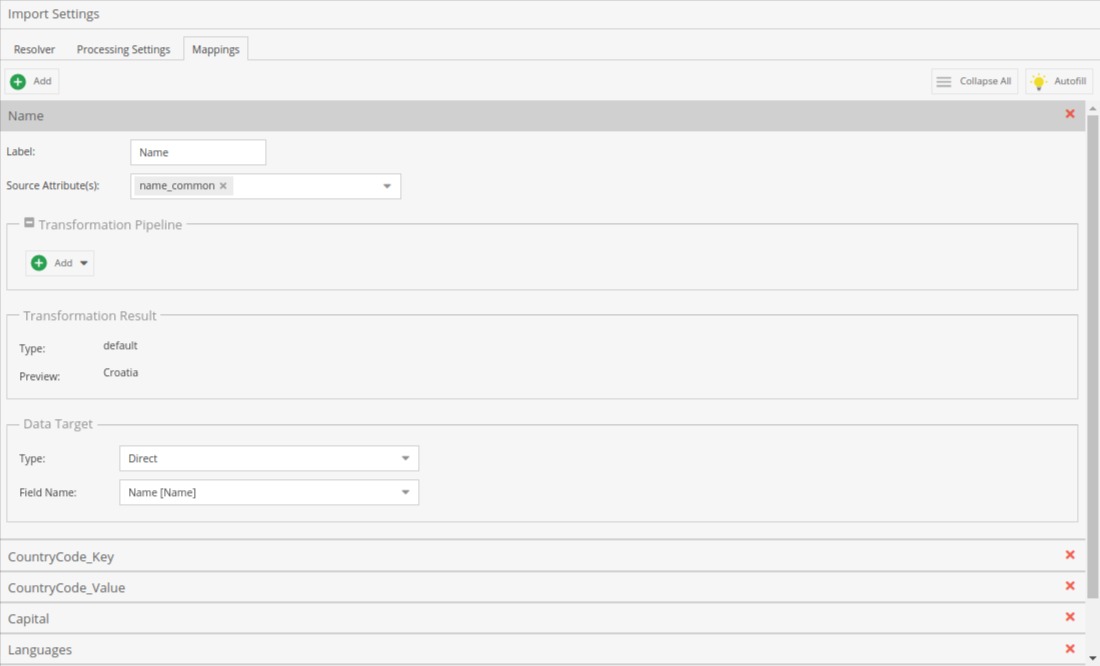
In this section, source properties get connected to the Pimcore data object. Here we can define which properties do we import to what property at the data object, and also during the import we can additionally transform the value.
There is also an “Autofill” feature with the lightbulb button which will add all properties from the source, detect its type, and assign it to the existing data object property.
For most source attributes there won’t be any transformation in our example as they are directly set to the data object, except for the image.
![]()
Since the image (country flag) is stored as a URL in our source, we’ll use the “Import Asset” transformation.
This will get content from the provided URL using the file_get_contents() method and create Asset objects with a key set from basename() return on that value.
Additionally, there is a many-to-one relation input in that transformation, where we can specify the target folder of created assets.
Following that transformation, the next one is “As Image Advanced” which will transform the Asset object into an ImageAdvanced object that can be assigned to the Country data object directly.
As there are many possible Transformations, we’re not going to cover them all, full list, what for, and how they are used can be found at the Data importer’s official documentation on this link.
In the end, we can set the type of data object property and Field name. Depending on the type, there will be different field names available.
For direct data type, we can set one system column which is data object Key - Note here that if we haven’t correctly configured resolver settings, there might be an error saying duplicate key on creation if we’re updating existing data objects.
Execution

On this tab, we can define when import should start. Since we’ve entered in crontab a script that checks the queue every minute, we can now put together another cron different for every import configuration through administration.
Note that when setting cron definition, it will only run at that time if the “Active” checkbox is marked on the “General” tab.
Additionally, we can run the script manually, which will add our request to the queue. Full queue list with actions to stop it can be seen in section “Execution status” below.
From the example above we’ve set that the import script is running every hour.
Import Logs
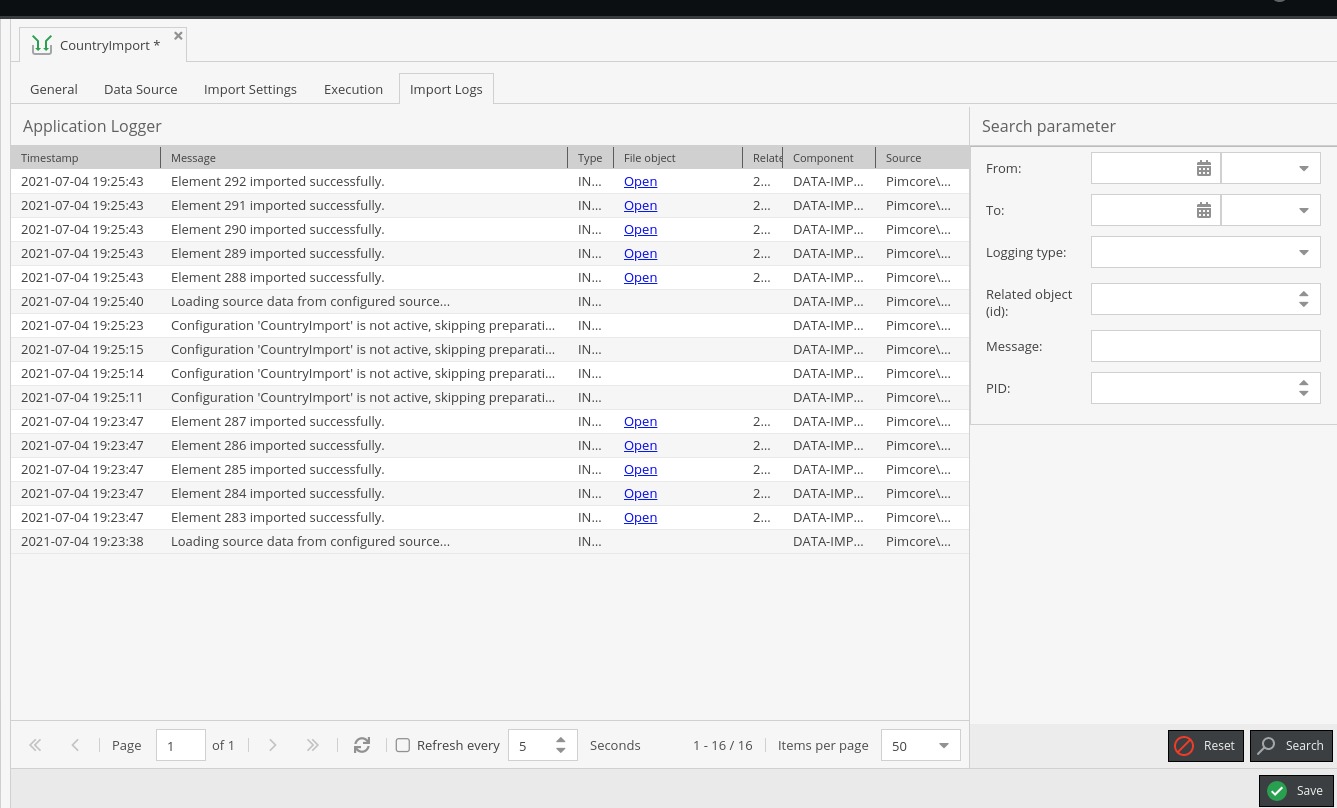
Similar to the general Pimcore Application logger, in the same layout, there are Import Logs which logs every row from the source that is imported. Note that depending on the size of the source, it may quickly use up free space on import logs.
In one application log row, we can see its source in the format that it arrived in and the ID of an object that was created or updated out of it with additional regular information, such as timestamp, message, source, etc.
Looking forward to using Pimcore's Data Importer?
The Data importer is a great way to add data sets into our system, especially if the source is export from another Pimcore environment where we can use the full benefits of its attributes.
For more complex import sources and strategies, there is always an option of extending each module we need.
That way we’ve covered quite a lot of importing capabilities, and given that it can be easily changed from different source types and automated to run at certain times, again, it’s a great feature to use instead of building something custom.
- Learn more about Pimcore and all of its features and capabilities by visiting our Pimcore knowledge base! It's filled with various guides, tutorials, and useful articles on Pimcore that you'll find extremely useful!
And if you'd like our assistance in Pimcore development, we're happy to help! Reach out to us and let's talk about your next project!