How to Export Key-Value column Pairs to JSON in Google applications
Whether working in-person or as part of a remote team of people, collaboration is an equally important part of the development process. Google’s research suggests that “collaboration has the power to boost innovation and efficiency” in businesses, providing the method of collaboration allows for agility, flexibility, and transparency.
Google’s collaboration tools – such as Docs and Sheets – are commonplace in most development workflows, including our own. They allow for quick and easy sharing of information across teams and individual team members. Plus, they’re easily extensible to suit a wide variety of use-cases.
The aim of this blog post is to demonstrate how to leverage Google application add-ons in order to automate a task. In the provided scenario, a spreadsheet is used to keep track of translated application resources such as error and status messages, or navigation element labels. The end goal is to create a Google Sheets script that prepares JSON-formated output of key-value pairs from resource ID and translation columns, so that localised resources can easily be used within developed software.
About Google Sheets Add-ons
Add-ons are special scripts that run inside Google Docs, Sheets, and Forms applications. Google sheets Add-ons make it possible to programmatically edit document content, leveraging various Google services in order to perform that task.
Google Sheets Add-ons are written in Apps Script, a JavaScript cloud scripting language developed and maintained by Google. Apps Script’s code editor can be launched from within Docs, Sheets, and Forms applications. This creates a script that is bound to the current document, allowing it to use special methods specific to the application the script is being developed for. For example, Sheets add-ons can call methods that concern the manipulation of spreadsheet cells and ranges.
Apps Script can be used to write both desktop and Android add-ons for Docs, Sheets, and Forms applications.
The Scenario
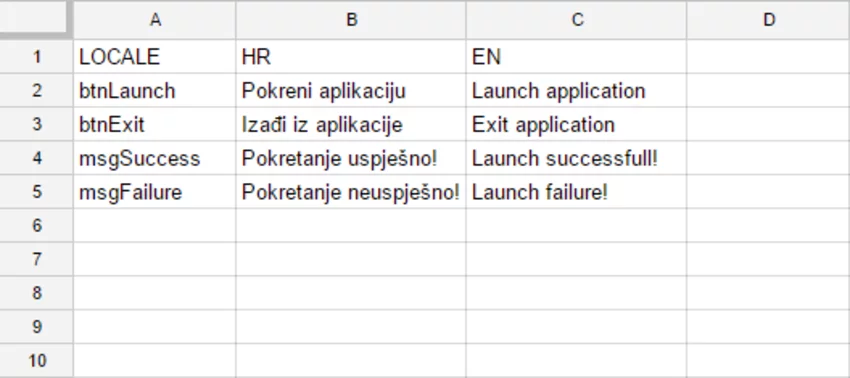
A hypothetical multi-language project is in active development, and the developers had enough foresight to keep track of various text resources in a Sheets document. The first column of the spreadsheet represents the unique identifiers (keys) by which the resources are referenced in the program code. Other columns represent the actual contents (values) of the resources, in different spoken languages.

The project handles localisation by loading an appropriate JSON-formatted file for the desired user interface language. The JSON containers translations which are assigned to unique resource ID keys used within the project sources. An example English resource file could look as follows:
Assuming that the localisation files are created from the spreadsheet data and maintained by hand, there is a risk of human error in that some changes or entries in the spreadsheet may accidentally be overlooked.
To remove that risk factor, a Google Sheets add-on can be created that will take two cell ranges – one for localisation keys, and the other for values – and parse them into valid JSON. The process of creating localisation files thus becomes quick, easy, and more reliable.
Creating the Google sheets Add-on
From within a new Google Sheets document, navigate to “Tools > Script editor…”. A window running the Apps Script editor should then appear, with a new script file open for editing.
The Google Sheets add-on needs to listen for certain application events in order to begin execution. Apps Script provides a number of simple triggers for that purpose. Specifically, onInstall(e) and onOpen(e) are key to the add-on development process: the former runs when the add-on is installed, and the latter when the document is opened for editing.
The add-on requires a simple user interface through which the user can select cell ranges for resource keys and translation values, and ultimately create the desired JSON output. User interface elements are written in HTML / CSS and interact with the add-on script via JavaScript.
The user interface can be displayed in a modal dialog, modeless dialog, or sidebar. The Google Sheets add-on will use a sidebar. The HTML layout is created within the Apps Script editor by selecting “File > New > Html file”, prompting for a file name (e.g. “Sidebar”). It is then parsed and handled by the HtmlService API which is made to create and serve HTML files. UI layout creation is covered in more detail in the next chapter.
At this point the Google Sheets add-on can be tested, even though it does not perform any actions. To test the add-on, it is necessary to refresh the document within which the Apps Script editor was launched. The editor window will close, and the add-on will be installed and available from the “Add-ons” navigation menu. Further edits to any add-on source files only require for the add-on to be restarted before changes take effect.
Note that executing the add-on will request permissions for editing documents on the user’s Google Drive. This is expected – it is intended for add-ons to manipulate document content.
Using the Sheets API
The Apps Script platform exposes a number of different APIs to facilitate development. Two such APIs have already been used: SpreadsheetApp, for interacting with the Sheets application; and HtmlService, for working with HTML layout files. Another useful API is PropertiesService, which makes it possible to store and persist data in the context of document, user, or script properties.
Considering the requirements put forth by the scenario described previously, the Google Sheets add-on should make it possible for the user to store selected cell ranges as keys and values in the localisation JSON.
Using the selections to create a JSON string is straightforward. Key and value ranges are read from document properties in A1 notation. The ranges are then fetched from the active sheet. Following that, their values are reduced into an object. The object is finally stringified and returned as the function result.
To facilitate UI interaction, a couple of helper actions are introduced that wrap around the existing functions. These concern the swift retrieval and storage of selected cell ranges.
Connecting the UI
The UI connects with the add-on script through a special client-side API in the google.script namespace. Note that functions defined as part of the add-on script are called asynchronously, and their results passed to failure and success handlers for further processing. If an executed function throws an error, that error will be passed on to the failure handler. Alternatively, any value returned by the executed function will be passed on to the success handler. A special user-defined object can also be set for use with handlers, in case a certain context of execution needs to be preserved.
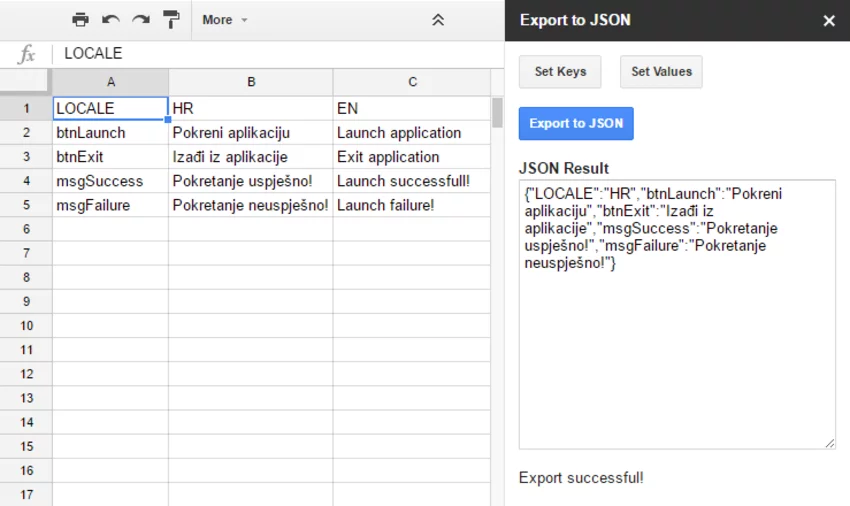
With the above changes made, the add-on is complete! Launching the add-on from within the Sheets document presents a sidebar with action buttons and a text area for the export result. By selecting a cell range or column and pressing “Set Keys”, the cell range for resource IDs is set. By selecting a cell range or column and pressing “Set Values”, the cell range for translated resources is set. These are kept as part of the document properties and persist throughout the document, meaning that it’s not necessary to re-set the keys range if the values range has been changed.

The “Export to JSON” button takes the ranges stored in document properties, creates a resource localisation object in accordance with design, and displays the stringified object in the result text area. This can then be copied to a file and used within the project.
Conclusion
Google application add-ons are simple yet powerful tools for automating tasks related to processing document content. In the presented scenario, the use of a Google Sheets add-on could dramatically speed up the time spent creating localisation files, and also make the entire process less prone to human error.
But this only scratches the surface of add-on capabilities. Hopefully, this blog post will encourage the creation of new add-ons for Docs, Sheets, and Forms applications that will transform Google’s collaboration tools in exciting and creative ways.
Happy coding!


