How to create a custom action for Pricing rules in Pimcore
What you'll learn with this guide
In this short guide, you’ll learn how to create a custom action used in Pimcore’s pricing rules.
Where to use
If you’ve ever wanted to create a custom action inside pricing rules where you could handle almost anything eCommerce-related for the customer, product, or cart - this is the right place.
A custom action gives you full control over what you want to happen if a certain condition is fulfilled.
Solution
Since we are basically using what Pimcore has already defined inside itself, we can look at some existing examples of actions used on Pimcore's GitHub.
Our custom action will allow us to add a certain customer term (albeit promotional or of other nature) when a condition has been met.
For example, if a customer has at least $100 spent in their current cart, we will add the term code ‘CART100’ to the environment which will then allow the backend to handle that extra benefit regarding the said term.
Step 1)
Firstly, we’re going to create the directories for the needed files.
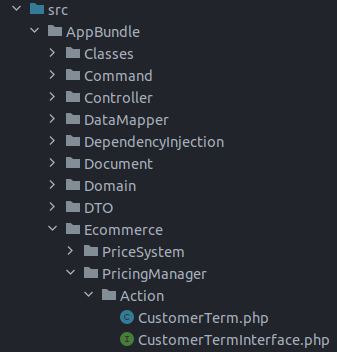
From your project root, find the ‘src’ folder and add these new directories src/AppBundle/Eccomerce/PricingManager/Action (AppBundle might be called App for you or something different).
Afterward, we created the two new PHP files inside the Action subfolder needed for our custom action - CustomerTermInterface and CustomerTerm.
It should look something like the image below. Don’t mind the extra directories if you lack them, just stick to the ones mentioned here in the guide.

Step 2)
Our next step is to open the CustomerTermInterface file in which we will extend the ActionInterface from Pimcore. After including Pimcore’s interface, we are going to introduce two new functions.
But before that, let’s see what we get from the already included ActionInterface.
Pimcore’s ActionInterface comes with four predefined functions:
- executeOnProduct - executes rule actions based on the current product. Expects to return the rule interface back.
- executeOnCart - executes rule actions based on current cart. Expects to return the rule interface back.
- toJSON - used for serializing data on frontend. Expects to return a string.
- fromJSON - used for deserializing data for frontend. Expects to return the ActionInterface.
Apart from that, we’re adding two new functions to extend on that:
- setTermCode - setting the term code.
- getTermCode - getting the term code.
These functions will be simple setter’s getter’s which we’ll touch on in the CustomerTerm file. Now our CustomerTermInterface should look something like this:
Step 3)
Now, let’s define what all those functions from the interface do in our CustomerTerm class. The functions executeOnProduct and executeOnCart are not really needed here since we’re making a fairly simple custom action so they’ll just return the interface. Setting up the other functions should make your file look something like this:
Regarding the CustomerTerm there is nothing special to point out, we’re simply encoding or decoding JSON data setting the term code.
Step 4)
Before we continue, it’s important to add our custom actions to Pimcore, now they’re just files sitting in our project folder. We add our action by opening the config.yml file and adding these lines below:
Admin UI
We’ve handled the backend part of our action, now we also have to add the UI which shows in our admin interface when adding/editing our pricing rule. The UI will be added through JavaScript, specifically Ext JS.
Step 1)
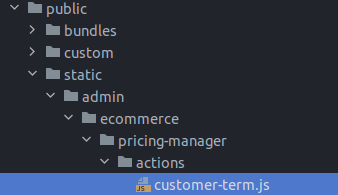
As with our PHP files, first, we have to create new directories for our JS files. Find your public folder in the root of your project and create these directories together with the customer-term.js file: public/static/admin/ecommerce/pricing-manager/actions/customer-term.js.

Step 2)
After we’ve created our directories and our file, open it and now we’re going to code the UI using Ext JS.
Here we’re defining the new action in the first line where we state our actionCustomerTerm will be a function that’s going to render the UI.
Firstly, we declare its name for use in the dropdown where we pick actions. It’s important to pay attention to the type, value, and name properties here since they have to match the ones in our PHP files for our action to show up and actually work as intended.
Now, this same function is used for showing up in the dropdown when picking or showing the UI panel when picked.
Step 3)
Similar to our PHP class, we have to include this file when starting our admin interface.
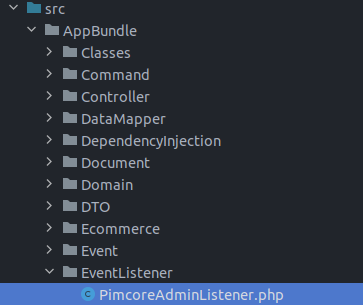
For that, we need to create new directories here (if they already don’t exist) src/AppBundle/EventListener/PimcoreAdminListener.php.
There we’ll create the above-mentioned file PimcoreAdminListener in which we’ll define to Pimcore that it needs to include our customer-term.js file.

Step 4)
Now, open the file in which we will define a new class and the function that will add the needed path for our JavaScript file to Pimcore and admin UI.
After that, we need to define our event listener in config/services.yml. And we do it like this:
And that should be it, we’ve defined everything we need to use our custom action.
Does it work?
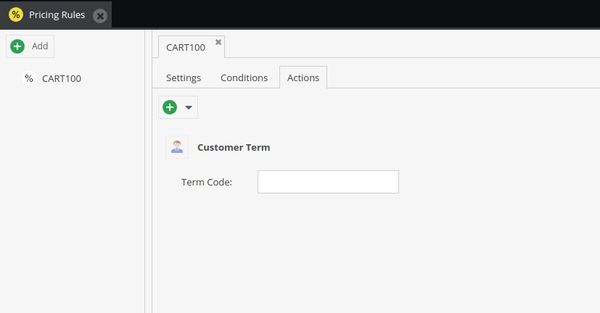
If you’ve followed this guide correctly you should now be able to open the Pricing Rules tab inside the admin interface and when you define your new rule there should also be your new custom action to pick.

Continue learning more about Pimcore!
Pricing rules are just a small fragment of what Pimcore has to offer. We've been exploring and mastering Pimcore for a long time, and we've set ourselves on a mission to bring Pimcore closer to all of its community members.
Our experts have been steadily filling up our Pimcore Knowledge Base with all kinds of how-to guides, video tutorials, and whitepapers.
Check them out and make sure you stay on top of all new features Pimcore brings to the table.
Do you have more questions or you're having issues while implementing this? Reach out to us; we’ll be glad to help!